In this article, we'll review creating a new automation, Entry Conditions, all the available 'Actions and Enabling an automation.
- What is a 'transaction based' automation
- Create new automation
- Set 'entry conditions'
- Build the 'actions' in an automation
- Available 'actions' and what they do
- Publish/activate an automation
What is a Transaction Based Automation
Transaction Based automations can only be assigned to a Transaction or loan. However, they can interact with both the transaction, and, any related contact on the transaction. This provides the ability to communicate with all contacts that are associated with a single transaction. Additionally, they provide the ability to update the Borrower and Co-borrower with updated Statuses and Tags throughout the process.
Just about anything having to do with a teams loan process can be automatically assigned and communicated to from within Lendware.
Nearly all of the functionality one can expect from a Contact Based Automation can be done (and more) with a Transaction Based Automation. Here are some of the common uses:
- Send loan milestone updates to all related contacts. Borrower(s), Agents, Title Rep, Insurance and more with email and SMS.
- Send notifications to your team for important milestones and your loan process
- Assign follow-up to members of your team
- Trigger automatic gifting automation
- Update the Status and Tags on Borrower(s)
- You can now set up a transaction-based campaign or workflow automation.
🎯 Transaction-based automations can now be added manually, just like contact-based automations. Each automation can only be assigned once per transaction.
👍 This concludes what is a transaction based automation
Create New Automation
- To create a new automation, choose 'Automations' in the menu group on the left side.
- Click the '+ Create Automation' button in the upper-right corner.
- At this point, the automation builder will load on the screen. The next step is to name the automation. It's incredibly important that we have a consistent, logical and recognizable naming convention. It is also important when viewing what automations are currently assigned or completed, when looking at the Borrower's contact detail.
Initially, it will say, 'Untitled Automation' - click in that text box to edit.
Edit the text to name our new automation - We can change the name later, at any time, without affecting the automation or it's assignments. Then click the 'Save' button. - The final step before customizing the automation is to choose the Automation Purpose. In this case, select Transaction-based automation, then decide whether you want a campaign or a workflow. Once selected, click the yellow Save button

👍 This concludes creating a new automation - now it's time to set the 'Entrance Conditions'
Set Entry Conditions
Entry conditions are used to assign an automation to many existing transactions at once and/or to transactions as they meet those entry conditions. The most common use is to assign the automation based on the entry conditions matching a combination of Loan Milestone and Loan Type - to send loan communications to the Related Contacts.
We will review many of the important Entry Conditions, but in this case, we will concentrate on assigning an automation when a transaction is both 'Sent to Processing' and a 'Purchase' loan.
- Status = Sent to Processing
- Loan Type = Purchase
The completed entrance conditions will look like this:
We can also add Condition Groups to expand the reach of our entrance conditions while also narrowing them down. By adding a condition group, we can provide more than one way for a contact to enter an automation. For example, we want to assign based on a loan milestone of 'Respa', as well.
- Status = Respa
- Loan Type = Purchase
The completed entrance conditions will look like this:
👍 This concludes setting an automation for automatic assignment
Build the 'actions' in an automation
Actions are added one at a time and we can choose to whom outbound actions are sent, emails and SMS. We can also assign tasks to specific users with delayed due dates. Tags can be added to the assigned contact, while Status can be updated, both will assist with keeping contacts organized and potentially triggering future contact based automations.
Adding Actions is effectively the same no matter the Entrance Conditions added to our automation. After adding entrance conditions, we will look for the following 'Actions' section in the automation builder. 
After clicking the '+ Add Action' button, a slide-out will appear on the right. From there we will choose the action we want to add. To begin, it's best to add a 'Delay' action. Even if the delay is just a few seconds, by adding a delay first, it will always be available, which will provide flexibility for future automation edits.
Next we will set the delay to 10 minutes and click, 'Apply' at the bottom-right.
Now, we have our first action complete. To add additional actions in the order they will take place, click the '+' button.
🎉 In many systems, delays are built directly into each action. Lendware believes you should be able to view every action, including delays, to allow for easy evaluation of a completed automation. Therefore, each delay is a separate step. Most likely, you will come to appreciate this methodology, especially when adding or updating existing automations.
👍 This concludes building an 'action' in an automation - In next section, we will review each Action type
Available 'actions' and what they do
In the above section, we showed how to add an Action. In this section, we will review what each Action accomplishes and the available options within each. This should provide you with all you need to know to build a powerful and comprehensive transaction based automation.
⚠️ Each action must complete before the next action will begin
Timers - There are 3 types of timer delays that we will cover. 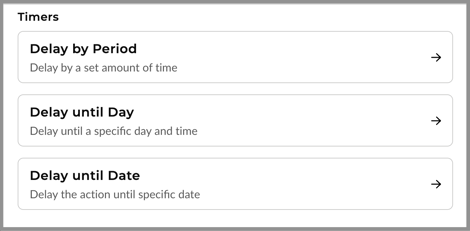
- Delay by Period - This is a standard count-down timer. Simply choose the delay period, then the unit of measurement - Seconds, Minutes, Hours, Days, Weeks or Months

- Delay until Day - This allows choosing a specific day and time within the coming week.

- Delay until Date - This allows choosing a specific date and time in the future. There is no set limit on how far into the future.

Communication - This allows adding an outbound email or SMS directly to any transaction Related Contact. Like, borrower, co-borrower, agents, title rep, insurance and more!
- SMS - Sending a direct SMS is a great option for communicating quick info to transaction/loan related contacts. Chose to whom the message is going to, then, utilizing merge fields, we quickly tailor a message that feels personal.

- Email - Sending a direct email is always a solid and expected method for providing updates during the loan process. Just like with SMS, choose the appropriate recipient for this action and we can either start typing our message, or, if we have the text or HTML prepared - paste it in the appropriate editor.

-
Webhook – Connecting with External Systems - Using a webhook action allows you to extend the power of your automation beyond Lendware. A webhook can send data to another application whenever your automation is triggered, creating seamless integrations with third-party systems. Simply configure the endpoint URL, define the data you’d like to pass along, and Lendware will handle the rest automatically. This is especially useful for updating CRMs, triggering notifications in external apps, or syncing records across platforms.

Agent actions
Lendware Agents – Intelligent Suggestions That Put You in Control - Lendware Agents are designed to provide smart, contextual suggestions as you build your automations. They help ensure that your workflows are not only functional but also optimized for efficiency and clarity. Agents may recommend actions, highlight potential improvements, or flag settings you might have overlooked. While the final decision always stays with you, Lendware Agents make it easier to create well-structured, high-performing automations.
 Learn more about Lendware Agents →
Sentiment Analysis – AI Recommendations: Sentiment Analysis uses AI to review customer communication history and notes to understand overall customer sentiment. Based on this analysis, the system generates an AI Recommendation indicating whether an automation should continue or stop.

Learn more about Sentiment Analysis→
In-app actions - These give more control over how the system will interact with the borrower and co-borrower contacts. We'll show how to utilize these 3 available actions to update those contacts for easy identification, long-term marketing and check-ins.
- Apply Tags - Applying a tag to a borrower is a great way to add context to ensure we have the full story on the contact. Tags can be whatever we want, we can assign as many tags at one time as well.

- Create Task - This is a great and effective way to schedule followup actions and for check-ins. Just keep in mind that if we want to task to be assigned later, we'll want to add a 'Delay' action before the Create Task action.

- Update Status - Changing or updating the borrower and co-borrower contacts is a must to keep our contacts well organized. Be sure to update the status at the truly important milestones. Like, Sent to Processing, Pre-approved and Loan Closed. Additionally, we can update the Transaction Status using this method.

The 'Add to Automation' action is not available for transaction-based automations.
👍 This concludes a walk-through of each available action type
Behavior – Controlling How and When Messages Are Sent
Stop on Reply - When Stop on Reply is turned on, any reply from a contact will immediately suspend the remaining messages in the automation. This ensures that once a contact engages with you, no further automated actions are executed—helping keep communication natural and responsive.
Allowed Communication Times - You can control when contacts receive communications by setting specific days and times for delivery. This ensures your outreach is both effective and compliant.
Set Days
- Weekdays: Select Monday through Friday (or all at once).
- Weekends: Select Saturday and Sunday (or both together).
Set Time
Choose the window of time during which messages can be sent. The default is based on your team’s time zone (e.g., America/Denver), but this will vary depending on your team. You can update your team’s time zone in your Team Settings.

Compliance Note: The TCPA prohibits sending text messages before 9:00 AM or after 9:00 PM.
-
Emails will still send outside these hours.
-
Text messages scheduled outside these hours will be queued and delivered at the next available compliant time.
Exit Conditions
Choose Exit Conditions (Optional)
Set the exit conditions for this automation step. If the specified conditions are met, the transaction will automatically be removed from the automation process.
Just like with Entry Conditions, you can use “AND” or “OR” logic to combine multiple rules and fine-tune when a contact should exit the automation.

Publish / Activate a Transaction-Based Automation
Publishing a transaction-based automation in Lendware is simple and straightforward.
Once your automation is ready:
- Save your progress to ensure all changes are kept.
- Click Schedule.
Safety Feature:
After activation, the automation cannot be edited until you click the ‘Edit Automation’ button at the bottom. Once edits are made, always click Save to confirm changes.
Workflow Scheduling
You can choose when your automation will start:
Start Now - The automation will run immediately upon clicking Start Now.
-
Note: Cancelling will not be available once the automation begins.
Start Later - Select a specific date and time for the automation to begin.
-
The automation will automatically activate at the scheduled time.
Example:
-
Date:
01/26/2025 -
Time:
10:00 AM
This flexibility ensures your automations run at the perfect time for your team and contacts.

👍 This concludes activating a transaction based automation and full walk-though of transaction based automations in Lendware
Need more help? Check out: Campaigns vs Workflows