Like the Contacts and Transactions pipeline views, the Tasks pipeline view gives a clear, visual overview of tasks organized by status. You can also toggle between My Tasks and Team Tasks to keep track of what’s assigned to you—or collaborate and follow up on team responsibilities.
To get started:
-
Click Tasks (📌 top-right corner).
-
Switch to Pipeline View if you’re not already there.

The Pipeline View arranges your tasks into four columns based on their status, allowing you to quickly update their status by dragging them between columns.
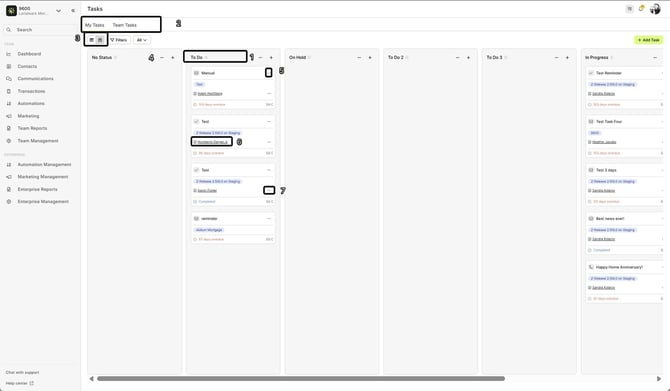
- Status: Pipeline View organizes your tasks into the following status-based columns:
-
To Do
-
In Progress
-
Done
-
On Hold (for tasks that need to be paused or temporarily delayed)
-
No Status (for tasks that haven’t been assigned a status yet)
You can easily drag and drop tasks between columns to update their status.
-
-
My Tasks vs. Team Tasks
Toggle between:
-
My Tasks – Only shows tasks assigned to you.
-
Team Tasks – Displays all tasks across the team.
-
-
List View vs. Pipeline View
Use the toggle button to switch between:
-
List View – Traditional table layout.
-
Pipeline View – Drag-and-drop visual board.
-
-
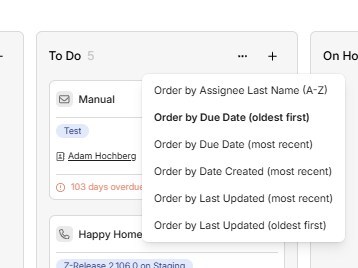
Sorting Options: In Pipeline View, you can sort your tasks to find the most relevant ones easily. Here are the available sorting options:
-
Order by Assignee Last Name (A-Z) – Sort tasks by the assignee’s last name in ascending order.
-
Order by Due Date (Oldest First) – Sort tasks by their due date, from the oldest to the most recent.
-
Order by Due Date (Most Recent) – Sort tasks by their due date, from the most recent to the oldest.
-
Order by Date Created (Most Recent) – Sort tasks based on the creation date, showing the most recently created tasks first.
-
Order by Last Updated (Most Recent) – Sort tasks by the most recent update date.
-
Order by Last Updated (Oldest First) – Sort tasks by the most recent update date, from the oldest to the most recent.
These sorting options allow for a customized view, helping you stay organized and prioritize your tasks efficiently.
-
-
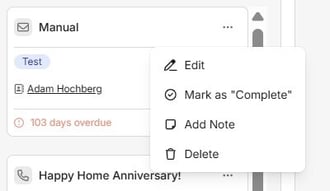
Edit or Delete Tasks
Each task has action options:
-
✏️ Edit – Opens the Edit Task drawer.
- Add Note – You can add a note to a task
- Mark as "Open" / "Completed" – This option allows you to toggle the task’s status.
-
🗑️ Delete – Permanently removes the task.
-
-
Open Contact Detail
Clicking a contact’s name on a task opens the Contact Detail page in a new drawer.
Use the ''X" button to return to your previous view.
-
Quick Actions on Linked Contact
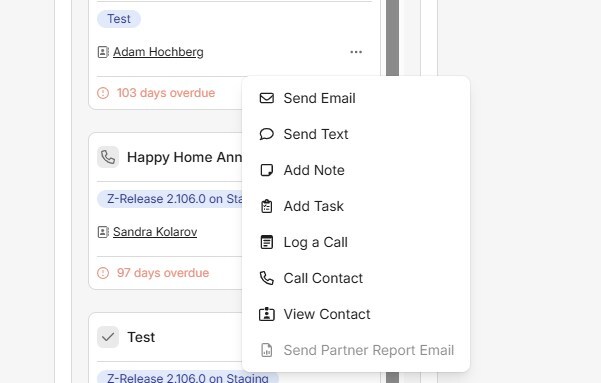
Available options for instant action:
-
Send Email
-
Send Text
-
Add Note
-
Add Task
-
Log a Call
- Call Contact
-
View Contact
-
Send Partner Report Email (if the contact is a partner Learn more)
-
Task statuses can be customized at the enterprise level, meaning your system administrator can create or modify statuses as needed.
Send Email, Send Text, Add Note, Add Task, Edit Contact – Access these actions directly from the pipeline view, allowing you to quickly communicate or make updates without leaving the page. This saves time and keeps you focused on managing tasks and contacts efficiently.
👍 This concludes a walk-through of the Task Pipeline View