SimpleNexus User Integration

Connecting yourself or another user to the SimpleNexus integration can be completed in just a few steps. Once completed, any new application submitted or application abandoned will automatically be added to Aidium as a contact, categorized with tags.

Key Benefits of the SimpleNexus Integration:

  1. No need to manually add a loan applicant or wait for your LOS to push them to Aidium
  2. Always reengage with applicants who stop midway though an app, with little to no effort from your team
  3. Trigger automations that target contacts based on their current situation
  4. Never forget about an application or rely on a human to communicate with or thank an applicant

⚠️  Before users can do the following steps, your Enterprise must have completed their initial API connection from SimpleNexus to Aidium. If you do not know, please contact your Company's Aidium admin and include a link to this article.


SimpleNexus Integration sections:


SimpleNexusFlowMap


Individual User setup

Each user in Aidium that has a SimpleNexus account must be setup one at a time in their Team Settings. It's an incredibly quick and straightforward process that can be completed in very few steps.

⚠️  When integrating a user, be sure to enter their email address in all lowercase.

  1. Log in to Aidium. If you are an admin or have access to multiple teams, be sure to enter the appropriate Team before continuing to the following steps.
  2. In the menu group on the left, choose 'Team Settings', then 'Integrations'.

    SNUserSetup1

  3. Next, the Team Integrations page will load. We will concentrate on the SimpleNexus Integration section. If you do not see that section, please contact your company's Aidium admin, as the initial SimpleNexus integration may not have been requested.

    SNUserSetup2


  4. From the SimpleNexus Integration section, click the 'Team Member' drop-down and choose the appropriate user. Next to that, 'SimpleNexus Email' is where you will enter the User's SimpleNexus login email in all lowercase. There is no need for a password to complete the setup.

    Once complete, click the 'Add Member' button, in yellow.

    SNUserSetup3
  5. If you are adding a single user, the process is complete.

    If you wanted to add additional users in that team, simply repeat Step 4 above until all users have been integrated. All users that are integrated will continue to be listed, as long as the integration is not disconnected for a user.

    To remove a user from the SimpleNexus integration, you can click the 'trash' icon next to their name in the SimpleNexus Integration section.

    SNUserSetup4
  6. Additionally, if there are users in other teams, just switch the visible team using the drop-down at the upper-left of the screen.

⚠️  Be sure to use all lowercase when entering a SimpleNexus Email address before clicking the 'Add Member' button.

⚠️  It is ideal that after you integrate a User, you also test the integration using the steps in the final section of this article.

👍  This concludes individual User setup for the SimpleNexus integration


When is a contact is pushed to Aidium


A contact is pushed to Aidium for two different reasons and each with different timings.

  1. When a client completes and submits an app in SimpleNexus, it will quickly pass the contact to User account linked in Team Settings to the SimpleNexus account specified (in the steps below). Aidium will create a new contact and assign it to the appropriate user - it will then add a Contact Tag: "SimpleNexus Application Completed"
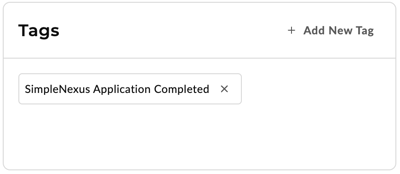
    SimpleNexusTags1
  2. When a client creates and account in SimpleNexus, but does not complete the app, it will wait about 2 hours and then push the contact. Aidium will create a new contact and assign it to the appropriate user - it will also add a Contact Tag: "SimpleNexus Application Abandoned"
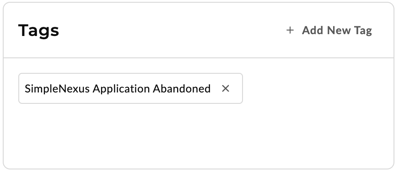
    SimpleNexusTags2

Not only will this help the user identify how the contact arrived in Aidium, but also what action (or inaction) took place.

In the following section, we will use this information to automatically assign an automation for appropriate follow-up by using an automation for each situation.

👍  This concludes understanding when a contact is pushed from SimpleNexus to Aidium


How to trigger an automation

The ideal way to manage new contacts from SimpleNexus is by building an automation, triggered by the tag automatically added.

  • SimpleNexus Application Completed
  • SimpleNexus Application Abandoned

⚙️  If you have not built an automation, or would like a refresher, click here


To begin, go to the Automations page in Aidium. Then, click 'Create Automation' button at the top-right. Provide a name that will be easily understood, like: "SN - Application Completed". It will also be helpful to create a description of the automation, this will help you or anyone else understand what this automation does and how it is triggered.

Once completed, the automation preview should look something like this:
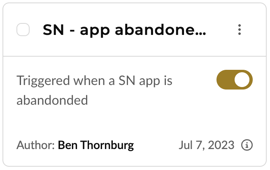
SimpleNexusAutomation1

Application Completed

  1. Create a new automation, then provide a name and description. Next, choose, "Contact-based automation". Click, 'Continue' button.

    SimleNexusAutomation2
  2. Next, we will add the Trigger condition for, 'SimpleNexus Application Completed' tag.

    SimpleNexusAutomation3

  3. Once your trigger condition(s) are set. You will then add the 'Actions' appropriate. For now, we will create a basic email.

    SimpleNexusAutomation4

  4. When satisfied with your automation, click 'Save Changes' and then enable the automation by clicking, "On" toggle at the top-right.

    Now, any contact existing or created, with the tag: "SimpleNexus Application Completed" will trigger this automation and assign Actions added.

Application Abandoned

  1. Follow the above steps 1-3 to create your automation, set the trigger conditions and add Actions.

    Be sure to use the tag: "SimpleNexus Application Abandoned" in the trigger conditions.

  2. When creating this automation, you may want additional emails and/or SMS notifications with delays.  This will help entice the applicant to either complete the application, or let the applicant know you're there to help with any questions or struggles while filling out the app.

  3. If adding additional actions, it is important to create Exit Conditions - this will STOP the automation when the applicant returns to the application and completes it.

    SimpleNexusAutomation5

👍  This concludes building a basic automation for each, Application Completed and Application Abandoned


Request SimpleNexus Integration (for Admins)

Before a team or user is able to setup their own SimpleNexus integration, an admin must first request the account integration directly from Aidium. Use the following steps to obtain the API key and set the minimum communication settings. Once completed, send the request to support@thinkaidium.com

  1. Log into SimpleNexus as an Admin. In the menu group on the left, go to the 'API Token Tool' page.

    SNAdmin1
  2. Click the 'NEW TOKEN' button on the top-right, then enter a token name. It is ideal to make the name descriptive, for example: "Aidium CRM Webhook"

    After creating a new token, you will see it listed, like in the below image. There are two buttons highlighted.

    a. First is the Copy Token Key button. This will copy the Key to your clipboard.
    b. Second is the Expand button, which we will use in step 3 to enable the appropriate communication settings.

    SNAdmin2

  3. After clicking the Expand button, you will want to enable the following functions.

    a. In WEBHOOKS section: ALL

    SNAdmin3a
    b. In BORROWERS section: GET /borrowers/:borrower_guid

    SNAdmin3-1

    c. In LOAN_APPLICATIONS section: GET /loan_applications/:loan_application_guid

    SNAdmin4
    d. In LOAN_OFFICERS section:
              GET /loan_officers
              GET /loan_officers/:loan_officer_guid

    SNAdmin4-1
  4. Send API token to Aidium Support:
    To request enabling of the SimpleNexus Integration - create an email to support@thinkaidium.com and include the following info:

    a. Subject: Initial SimpleNexus Enterprise Integration for

    b.
    Enterprise Slug: In Aidium, (logged in as an admin) click the Team Name at the top-left of screen and choose 'Enterprise Settings'.

    SNAdmin5
    Copy the Enterprise Slug and paste into the email.

    SNAdmin6a
    c. In SimpleNexus, Copy the API token (in Step 2 above) and paste into the email.

    SNAdmin2

  5. Once Aidium has confirmed the SimpleNexus Integration is ready - It is advised that an Aidium admin set up a single User in the their Team Settings, using the steps in the Individual User Setup section above.

    Once a user is integrated, it is important to test twice - with two unique 'dummy' contacts in SimpleNexus. Be sure to send the app to the 'dummy' user, rather than filling out the application as the loan officer. This will ensure SimpleNexus interprets it as a unique applicant account.

    a. Start and submit a completed application - The contact should be created in Aidium within a few minutes with the tag: SimpleNexus Application Completed

    b. Start, but do NOT submit a completed application - The contact should be create in Aidium in about 1.5 hours with the tag: SimpleNexus Application Abandoned

👍  This concludes the admin setup for the SimpleNexus integration - If these instructions are not clear, do not match what you see in SimpleNexus, or you have questions/concerns, please email support@thinkaidium.com


Testing a User after initial integration

After integrating SimpleNexus in the above admin steps, it's imperative that an admin (or the User integrating) tests the integration with one or more User accounts. This is a very straightforward process, if you follow the steps below. Total time for testing will likely be slightly more than two hours.

It's best to designate a few Aidium Users with SimpleNexus loan officer accounts to integrate their account using the steps in the above section, Individual User Setup. Be sure your testers have access to those User's SimpleNexus Loan Officer interface. While it may not be necessary, having access will assist in any troubleshooting, if needed.

The following steps should be completed for each User being tested. Be sure you're logged into your SimpleNexus account of the User from whom testing is to be done and the above steps have been completed to Integrated this User's SimpleNexus account with Aidium.

Steps to Test a Submitted Application

  1. On the left menu group, go to Personal \ Loans

    SimpleNexusTesting1
  2. Click on the 'LOAN APPLICATIONS' tab and click the 'ACTIONS' button.

    SimpleNexusTeesting2
  3. Choose '+ New Loan App'

    SimpleNexusTeesting3
  4. Add a unique email address (it does not have to be real for testing). After clicking 'CREATE NEW LOAN APP' button, continue filling out the app and submitting it to test for 'SimpleNexus Application Submitted'.

    SimpleNexusTesting4
  5. Log into Aidium with access to the User's Team. Go to that team then search for the borrower name or email to verify it was created. Open the new contact and verify Name, Email, Phone and tag = SimpleNexus Application Completed.


Steps to Test an Abandoned Application

  1. In the left menu group, go to Personal \ Share App.

    SimpleNexusTesting5
  2. Click share by email and send to a personal or secondary work email (one that has a different email than your SimpleNexus LO account).

    SimpleNexusTesting6
  3. Log Out of SimpleNexus.
  4. Click the link in the email sent in Step 2 above.
  5. Follow the steps to activate your SimpleNexus borrower account.
  6. Start filling out the application, but stop after entering (and saving) the contact information (First Name, Last Name, Cell Phone, Email).
  7. Wait 2 Hours to allow for SimpleNexus to determine this is an abandoned application.
  8. Check Aidium for the contact you created in SimpleNexus and to ensure it was sent to Aidium with a tag = 'Simple Nexus Application Abandoned'

Both are a Success

  1. If both contacts were created in Aidium with their appropriate tags, you have successfully tested and verified a single user and the Enterprise Integration itself.
  2. At this point, you can test with another User that meets the requirements: has a SimpleNexus account managed in the same account AND this loan officer also has an Aidium account.

Contacts Not Created

  1. Go to the testing User's Team in Aidium. Verify the User is integrated with SimpleNexus in Team Settings\Integrations
  2. If the user is integrated, remove the integration. Verify the login details for SimpleNexus are correct (by logging in to SimpleNexus in a web browser). If those credentials work, re-integrate the User with those exact credentials.
  3. Verify (as SimpleNexus Admin) that step 3 in the Request SimpleNexus Integration (for Admins) section is correct.
  4. Return to the beginning of this section and re-attempt testing.


Data Matching from SimpleNexus to Aidium

It's important to understand that when data, especially contact data (email and phone) are fully unique when passed to Aidium from any contact in your database, it will not match by First and Last Names alone.

For example, you have an existing contact in Aidium as Bill Johnston, billyj@email.com, 333-222-1111, but the loan application contained William Johnston, willy@email.com, 444-333-2222 - a new contact will be created in Aidium.

Additionally, an account can be created by the SimpleNexus user with specific contact details, name, phone, email - but the person filling out the application can update that information to any values they choose.

For example, if a user created an account as John Smith, 111-555-1111 but in the loan application entered Jack Smith, 222-555-2222, the Jack Johnson data would be brought into Aidium and create a unique contact.

👍  This concludes the testing the SimpleNexus integration - If these instructions are not clear, do not match what you see in SimpleNexus, or you have questions/concerns, please email support@thinkaidium.com