By using the MAXA integration, you can create more than just flyers and attachments. There are a myriad templates at your fingertips, ready to easily customize for social media posts, social media banners, events, and much more. Best of all, you can download them directly to you computer or have them professionally printed and delivered.
- Setup MAXA for the First Time - Skip this step if you have an existing (Team or company-wide) MAXA account
- Access MAXA Tutorials from within Aidium
- Create New design
- Add design to an Email
⚠️ Important: The MAXA integration requires a paid MAXA account (individual, team, or enterprise). If you don’t have a MAXA subscription, you can still use our Canva integration — which supports both free and paid accounts.
Setup MAXA for the First Time
If this is the first time accessing MAXA, there are no designs to add. We must first go to the MAXA main page and setup our user details. This will allow our information, head-shot and logo to automatically merge into any new designs we want to create.
- In the main menu group, select 'Team Settings' - then, select 'Integrations'.
- After the Integrations screen loads, click on the 'Open MAXA' button.

- Next, the MAXA screen will load. At this point, we're looking an embedded version of the MAXA site. All user settings, logos, head-shot and user information entered or edited will affect MAXA and designs generated within. Any changes will not directly affect your Aidium user or team settings and will only be used to quickly create or update designs in MAXA.
If this is your first time accessing MAXA, your dashboard will be empty.
To begin the initial setup of our user account in MAXA, we'll click on our name at the top-right. Then, choose 'Account', then 'Account Settings'.
- Once we arrive at our user account information page, we will add all the information available. In the animated GIF below, we'll show adding important personal information, like title, nmls, location details, head-shot, team/personal logo and company logo.

- Before we save, we'll also add our company colors, which will be used for even more consistency with branding of designs.
There are many options for choosing the Primary and Secondary Colors. Either picking the color using the pallet, with RGB, CMYK or with HEX code. In our case, we have our HEX color codes handy, so we'll use those.
Once your colors are set, be sure to click, 'Save Account Information' to
- Now that we've added our personal, team and company information - we can quickly add new designs from the extensive MAXA template library!
👍 This concludes the initial setup of a user's MAXA account
Access MAXA Tutorials from within Aidium
Now that we have our account setup - it's time to add our first design. MAXA comes with an extensive template library to quickly get flyers, announcements and much more setup with just a few clicks.
But, before we begin, it's important to know that MAXA already has great how-to articles and videos available within their interface. Watch the below animated GIF to see how to access and find an appropriate tutorial.
👍 This concludes accessing MAXA tutorials for self-service education
Overview of MAXA designs
To begin, we'll first access the MAXA integration from the 'Team Settings', then 'Integrations'.
After opening MAXA, we'll click on either 'Most Popular Templates' or 'Complimentary'.
Most Popular Templates: provides the most commonly used templates by other users.
Complimentary: is a full list of free to use templates that are categorized for easy identification.
Simply find the template that best fits our current needs, hover over it to expose the 'Create Design' button, then select it to customize it to our needs.
The previous section shows how to access MAXA's tutorial library, which is highly recommended for detailed how-to product use. Since MAXA offers tutorials and how-to videos on using their product, we will not be going step-by-step on creating and editing designs. But, we will review functionality that enhances your use of Aidium.
Once we have customized designs in the 'My Designs' dashboard, it will look like this:
From the Dashboard, we can click the ". . ." (ellipsis) at the top-right of any design to do the following.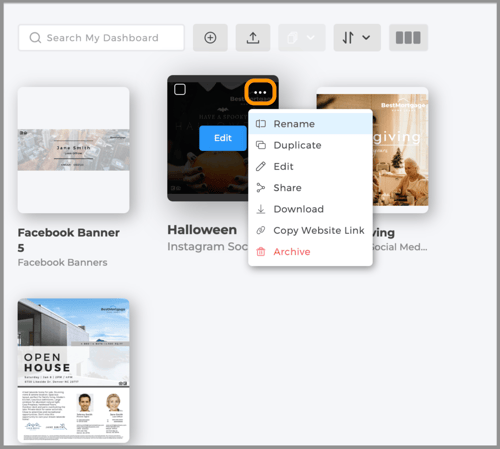
- Rename - Change the display name of the design.
- Duplicate - Copy an existing design to make adjustment for another use.
- Edit - Click to edit the existing design that we either created or was created for us.
- Share - Post to Social Media, Copy to Another User and more.
- Download - This will likely be the most useful option. Depending upon the design, this will make is easy to share, add to social media, keep handy for future use, etc.
- Copy Website Link - Capture a public and sharable link to a design.
- Archive - Remove the design from the dashboard.
👍 This concludes the overview of MAXA designs
Add a Design to an Email
Once we have at least a few designs setup in our MAXA account, we can begin to use them for quick direct emails from Aidium. As we interact with new leads, prospects, closed borrowers, new and existing agents and partners, we can quickly attach existing designs when sending out direct communications.
⚙️. For a how-to video on adding a Maxa design to email, click here
To demonstrate, we'll first go into the contact detail of a contact. Then we'll click the 'Email' button.
- Add a subject and begin typing out your message.
- Place the cursor where you want the MAXA design to be placed within the email and click the 'Add Image' button, then choose 'Maxa'.
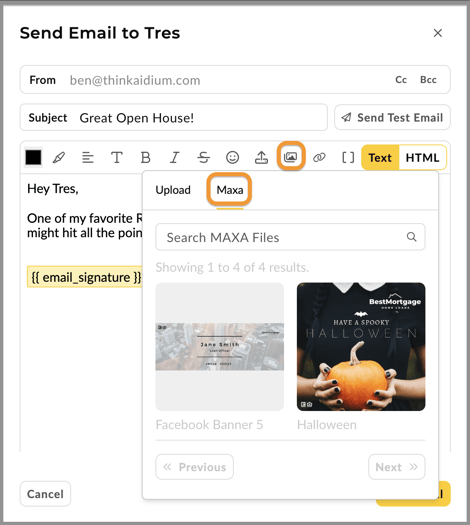
- Next, you can scroll through the available designs, or use the 'Search' bar to add text to narrow-down the available designs - as seen in the below animated GIF.
- Once the email is completed, we'll click the 'Send Email' button.
👍 This concludes adding an existing design to an email in Aidium