- Automations Purposes - Contact vs. Transaction
- Automations View - Getting started with viewing Automatons table
- Intro to a New Automations - Basic understanding of structure
Automation Purposes
There are two main types of Automations and unlimited possibilities within each - We will describe the most common usage for each:
-
Contact Based:
- Drip (Nurture) Campaigns - Manually or automatically assigned series of Emails, SMS (Text Messages), and/or Tasks with time delays or schedules.
- New Leads - Automate your teams best intentions - Communications, Tasks, Assignments, etc. Never lose track of a lead, no matter where it came from and what it's situation.
- Long Term - Marketing, Notifications and Anniversaries - Send monthly Newsletters, inform Partners, Birthday greetings, etc. All can help you stay in front of your database as an industry expert, with little effort.
-
Transaction Based:
- Loan Milestone notifications and communication - Inform anyone associated with a loan and from any user, with timely and consistent communications using the medium you prefer.
- Loan Documentation notification and communications - Inform anyone associated with a loan and from any user. Setup automated standard processes based on the way your team works.
- Out of ordinary situations - Transactions in a status too long, Lock expiration, Closing date missed, etc.
👍 This concludes Automation Purposes.
Automations View
Automations are not complicated, however, there are aspects that make them incredibly powerful and useful. Due to their ease and power - your team, organization and marketing entities will take advantage and continually add, modify and enhance these automations.
To view existing Automations and to add a new Automation - To start, click 'Automations' in the left-side menu.

The Automations section will load, showing all existing automations associated with your team. Often and most likely, by default, you will see many automations provided by one or more of the following methods:
- Default 'Playbook' automations provided by Lendware.
- Default 'Brand' provided by your Mortgage Corp or Marketing entity.
- Those created by your or your team.
- Pushed down by your marketing administrator.
This is how the Automations page will appear:
- Playbook Automations - This opens the Playbook page for adding pre-built automations. To learn more about playbook automations, click here.
- Create Automation - Button to create or start a new automation.
- Show/Hide Automations - Will quickly show only those automations that are currently, Active, Inactive, or will show all automations.
- Select one or more Automations - By checking this box on one or more automations, additional options will appear at the bottom for quick action on one or more automations.
- More options on a single Automation - By clicking, this will provide additional quick actions on just that autoamtion.
- Active switch - This will display the current status of each automation and will allow for quick toggle from on to off, or, off to on.
-
Sort Options – This dropdown allows you to organize your automations as needed.
-
Change View – You can switch between the table view and the classic view (the current view)
👍 This concludes Automation View - The more you build and edit automations, the more familiar it will be.
Intro to a new Automations
First, to create a new automation - As seen above, click the '+ Create Automations' button in the upper-right. You will then be given the choice of Contact Based Automation -or- Transaction Based Automation. Each are defined above, in this article.
- Automation name - Click to edit the name. It must be unique. It's highly suggested to make the name straightforward and logical to understand the function of the automation at a glance.
- More options - Click to edit the automation Description (open text for giving longer explaination of the purpose and summary of actions) and Delete option.
- Save changes - Click to save the automation in it's current state.
- Schedule - Allows users to either run the automation at the time of clicking on Schedule or by scheduling the automation to run at a later time. This applies to both campaigns and workflows.
- Automation purpose - Required decision when first creating an automation. You must know if this automation will target a Contact or target a Transaction.
Once you choose your automation purpose it will remain through the life of your new automation. Before beginning to build any automation, you should always name it first. It's will become incredibly important to standardize the naming of your automations. As time goes on and you build more and more automations, understanding their purpose will help you navigate your automations in the future.
There are three distinct sections of an automation:
- Entry Conditions - Set criteria for automatic assignment or no automatic assignment. Entry Conditions are required for transaction based automations, as they cannot be manually assigned.
- Automation Behavior -
- Actions - All the things you want to happen after an automation is assigned
- Exit Conditions - Set criteria for automatic un-assignment of the automation.
Entry Conditions
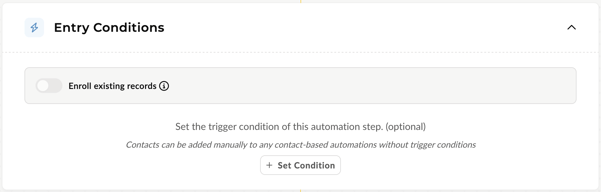
- Manually Assign - To allow a user to make the decision to manually assign a Contact based automation, you will simply leave the 'Entry Condition(s)' blank with no Conditions set. With a Transaction based automation, you must set the Entry Conditions, you are unable to manually assign a Transaction based automation.
- Automatic Assignment - For automatic assignment of an automation, you will be required to set Conditions. Each condition is based on a data field within a Contact or Transaction and you can set multiple conditions, as well as, condition groups to allow for 'and' / 'or' options to further narrow-down or expand your criteria.
- Enroll existing records - This toggle will enable assignment based on the entry conditions to any contact or transaction that currently meets the entry conditions. Rather than waiting for a contact or transaction to be updated to meet the entry conditions, this will allow the automation to assign to those entities that meet those conditions at the time of activation of the automation.
Important Behavior of Entry Conditions
If a contact or transaction is already enrolled in an automation and the entry conditions are later changed, the system will re-evaluate those conditions.
If the record no longer meets the updated entry conditions, it will be automatically removed from the automation.
For this reason, changes to entry conditions should always be reviewed carefully before saving.
👉 Entry conditions are required for Campaigns, but not for Workflows. Contacts can be added manually to workflows without a set entry condition
Automation Behavior

- Stop on reply - This toggle will enable the automatic un-assignment of an automation if the assigned to contact replies to an email or SMS. This comes in handy when assigning aggressive campaigns or a campaign that is requesting action by the recipient, where once their attention is confirmed, there is no longer a need for additional actions.
- Do not enroll records after - This toggle will stop new automation enrollments after a specific date. Extremely helpful for date based events or communications.
- Allowed Communications Times - This allows setting the time-of-day and day-of-week that communications will send from this automation. Each automation has the option of setting this to direct communications to send when the audience is most likely to read, respond and interact with the content. Click here to learn more.
Automations Action
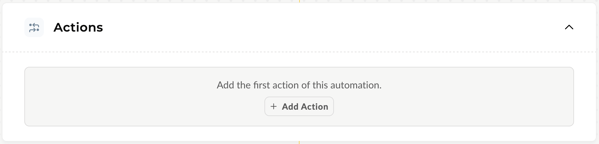 Actions are where the magic happens. This is where you can build and add communications and follow-up in the following ways.
- Set Delays - by min, hour, day, week, month, year or specific date
- Send Email - send to contact or any related contact
- Send SMS or text message - send to contact or any related contact
- Webhook - Set up webhook action
- User Input Notification - The notification will show two action buttons (Yes/No). If the user selects Yes, this automation will continue. If the user selects No, this automation will stop.
- AI Recommendation - AI will analyze customer data and provide a recommendation for this automation to continue or stop based on the customer sentiment, determined by analyzing communication history and notes. Users will see this recommendation as a notification and make their own decision to continue or stop the automation.
- Add to another Automation - to allow for simultaneous actions
- Apply Tags - to help keep your records organized
- Create and assign Task - to keep your team organized, fulfill promises and nurture leads
- Update Status - to help keep your contacts and transaction organized and helps automatically assign future automations
You can use any or all of these types of actions to build a robust automation.
Exit Conditions

Exit conditions set the criteria for when a contact should be removed from an automation. For example you have a contact on a lead nurture campaign who has just started a new loan.
- Manually Remove - To allow a user to make the decision to manually remove a Contact based automation, you will simply leave the 'Exit Condition(s)' blank with no Conditions set.
- Automatic Removal - For automatic removal of an automation, you will be required to set Conditions. Each condition is based on a data field within a Contact or Transaction and you can set multiple conditions, as well as, condition groups to allow for 'and' / 'or' options to further narrow-down or expand your criteria.
❗Please note that Exit Conditions are evaluated at the same time as entry conditions. If a contact or transaction meets both entry and exit conditions, it will not be added to the automation.
⚙️ Learn more about Contact based Automations
⚙️ Learn more about Transaction based Automations
👍 This concludes the intro to a new automation