These settings ensure your workflows stay aligned and efficient—whether you’re a team member or an Enterprise admin. If your user account has access to multiple teams, you’ll be able to view and adjust settings for each one individually.
Before we describe or demonstrate each option, we'll first show how to access each. First, we'll click the '⚙️ Team Management' button in the main menu group on the left.
Next, we'll see all of the options available to us.

- Profile - Basic Team Details - Name, timezone and team logo
- Integrations - Connect to 3rd party systems available to your team, including Zapier, Maxa, setting-up a team phone number for SMS/Texting and call forwarding, SimpleNexus and Encompass (some require Enterprise Admin to request availability)
- Members - View existing users and invite new users
- Contact Statuses - Add/remove, edit and reorder to keep our contact organized
- Custom Contact Fields - Add/remove and edit additional contact fields to capture and view additional information
- Tags - Add/remove and edit tags to help tell the story and organize our contacts
- Transaction Statuses - Add/remove, edit and reorder to match your LOS and keep our transactions organized
- Custom Transaction Fields - Add/remove and edit additional transaction fields to capture and view additional information
Profile
The Team Profile section has 3 easy to change settings. First, we'll click the 'Edit' button to allow editing of this section.

Next, a drawer will slide-out to give us access to updating any of the 3 settings.

- Team Logo - To add or update our logo, we'll click the 'Upload Image' button. Then, from our computer, we'll chose the appropriate team logo.
Team Logo size - It is important to limit the actual size of a team logo. This will allow for a pleasing appearance in emails when using a merge field for Team Logo. The following diagram will show the suggested resolution (in pixels) for both horizontal and square team logos.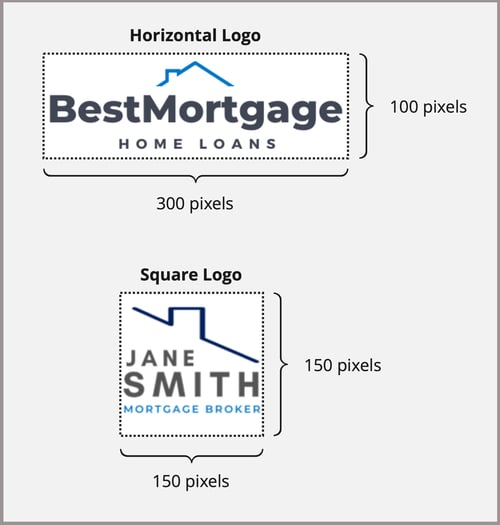
- Team Name - Not only will this team name display when switching teams, but can also be used as a merge field in emails and text messages.
- Timezone - The team timezone will be used to determine when actions happen in automations. If we're in Central Time, all automation action (delays) will look to Central Time, regardless of which timezone we may be currently located in.
The Team display name at the top-left may require a browser refresh to update, after changing the team name.
👍 This concludes updating the team profile
Integrations
It's important to keep in mind that the available integrations are based on Enterprise administration request and setup. These are connections with 3rd party services to bring data in/out of Lendware automatically.

- Zapier - This is a powerful intermediate for data. Since we have a more detailed article, we won't go into detail now. However, to learn more, click here.
- Phone Integration - This is where we can setup a team phone number for outbound text marketing and updates, responses to those messages and automatic forwarding when someone calls the number. Before we can choose a number, our Enterprise admin is required to submit a request for approval. Click these links to learn more about adding a number and setting-up forwarding.
Encompass and SimpleNexus are now accessible through Enterprise Management.
- SimpleNexus Integration - If our company uses SimpleNexus and our Enterprise admin has setup integration, it will appear here for our team's use. Each SimpleNexus user can connect their account in this section. To learn more, click here.
- Encompass - If our company uses Encompass as our LOS and our Enterprise admin has setup integration, it will appear here for our team's use. Each Encompass user can connect their account in this section. To learn more, click here.
👍 This concludes a walk-through of the available team integrations.
Contact Statuses
Not only do contact statuses help us organize and segment our contacts based on their current situation, but they also help us drive automation assignments. Learn more about contact based automations here.
We can add new contact statuses to our team, delete, edit and even reorder their display in both the 'drop-down' on a contact, as well as in the 'pipeline view' on the Contacts page.
- Adding a new contact status:
First, we'll click the '+ Add Contact Status' button at the top-right.
Next, a pop-up will appear, allowing us to type or paste in the next status name. Once entered, the system will verify that it is unique. If it is, we can click the 'Create' button.
- Edit and Delete an existing status:
To edit a status, we'll look for the 'Edit' button on that status. Just like adding, we'll receive a pop-up that allows us to enter a different name.
To delete a status, we'll look for the 'trashcan' icon. Again, we'll receive a pop-up, but this time, confirming we want to delete. Note: Often a status cannot be deleted due existing contacts in that status -or- when used as entry/exit conditions in an automation. This is a feature to protect from unanticipated data loss or breaking of existing automations.
- Reorder contact statuses:
To move the order, we'll look for the 'grab' icon on the far right of the status we want to move. Simply click and drag the status to it's preferred location. We can do this as many times needed, until we are satisfied with the order.
👍 This concludes a walk-through of the contact status options for teams.
Contact Custom Fields
Custom fields are a great way to capture additional information about a contact that may be specific to the way a team or enterprise does business. We can add a text field, date field or number field. Additionally, any field we add can also be used as a merge field in emails and text messages.
Here we can add, edit or delete custom fields. However, if a custom field is provided at the enterprise level, they are not able to be edited by a team.
Rather than go into detail now, here's an in-depth article on Contact Custom Fields.
👍 This concludes a brief overview of the contact custom fields section.
Transaction Statuses
Not only do transaction statuses help us organize and segment our transactions based on their current situation and/or milestone, but they also help us drive automation assignments. Learn more about transaction based automations here.
We can add new transaction statuses to our team, delete, edit and even reorder their display in both the 'drop-down' on a contact, as well as in the 'pipeline view' on the Transactions page.
- Adding a new transaction status:
First, we'll click the '+ Add Transaction Status' button at the top-right.
Next, a pop-up will appear, allowing us to type or paste in the next status name. Once entered, the system will verify that it is unique. If it is, we can click the 'Create' button.
- Edit and Delete an existing status:
To edit a status, we'll look for the 'Edit' button on that status. Just like adding, we'll receive a pop-up that allows us to enter a different name.
To delete a status, we'll look for the 'trashcan' icon. Again, we'll receive a pop-up, but this time, confirming we want to delete.
Note: Editing or deleting a transaction status is usually not recommended. In fact, either editing or deleting can cause unintended consequences when there is an LOS integration, either native or via Zapier connection. We should always consult our Enterprise Admin before attempting to edit or delete a transaction status. - Reorder transaction statuses:
To move the order, we'll look for the 'grab' icon on the far right of the status we want to move. Simply click and drag the status to it's preferred location. We can do this as many times needed, until we are satisfied with the order.
👍 This concludes a walk-through of the transaction status options for teams.
Transaction Custom Fields
Custom fields are a great way to capture additional information about a transaction that may be specific to the way a team or enterprise does business. We can add a text field, date field or number field. Additionally, any field we add can also be used as a merge field in emails and text messages.
Here we can add, edit or delete transaction fields. However, if a custom field is provided at the enterprise level, they are not able to be edited by a team.

Rather than go into detail now, here's an in-depth article on Transaction Custom Fields.
👍 This concludes a brief overview of the transaction custom fields section.
Team Members
This section provides a quick overview of the users who have access to this team as well as the ability to add a new user directly to this team.
Most of the time, adding users is better managed through Enterprise Settings, as we can connect the new user to multiple teams at once.
👍 This concludes a brief overview of the Team Users section.
Contact Tags
Tags are a quick and easy way to tell the story of a contact - their situation, their needs, their relationship to us, our needs from them, and just about anything else we can think of.
These can be added, edited and deleted from this section.
- Adding a new contact tag:
First, we'll click the '+ Add New Tag' button at the top-right.
Next, a pop-up will appear, allowing us to type or paste in the new tag name. Once entered, the system will verify that it is unique. If it is, we can click the 'Create' button.
- Edit and Delete an existing tag:
To edit a tag, we'll look for the 'Edit' button on that tag. Just like adding, we'll receive a pop-up that allows us to enter a different name.
To delete a tag, we'll look for the 'Delete' button. Again, we'll receive a pop-up, but this time, confirming we want to delete.
Note: Editing or deleting a tag will not be allowed if it is used within an automation as entry or exit conditions.
📌 Before removing a contact or transaction status, please ensure it is not actively utilized in any contact or automation actions or triggers, as these must be resolved prior to proceeding with the removal.
👍 This concludes a walk-though of contact tags for teams.