How to Filter Your Transactions
Filtering Transactions is a quick and effective way to narrow down what you see, whether you're using Table View or Pipeline View.
Filtering Transactions works in a very similar way as Filtering Contacts. You're simply filtering for different fields. To see how to Filter your Contacts, click here.
- Add basic Filter to your Transactions
- Add multiple Filters to your Transactions
- Remove Filters Applied
⚠️ A filter will stay applied, so it's important to note if filters are applied when going back into your contacts. Just look for the box with a number, next to the 'Filter' button. A '0' (zero) means no filtering is applied. Any number above that, means there is filtering applied.
Adding a basic Filter to your Transactions
- Start by clicking the 'Filters' button - If there is a number in the box, it's showing the number of current filters applied to Transactions.

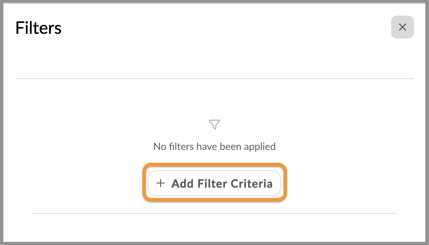
- Next, the Filter drawer slide-out on the right side of the screen. To create and apply a new Filter, click the '➕ Add Filter Criteria' button.

- Next, a drop-down of available fields to use for the Filter. Choose the appropriate field. In this case, we're using Status.
After choosing the field we want to Filter, we then choose the value for the field. In this case, we will filter for all Transactions with a Status = Sent to Processing, as seen in the animated GIF below. Once satisfied with the Filter Criteria, click the 'Apply' button.
⚙️ Learn how to save and manage saved filters, click here.
👍 This concludes adding a basic filter to your transactions.
Adding multiple Filters to your Transactions
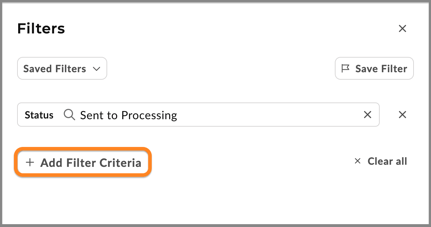
- Once you know how to add a basic Filter, you can apply multiple filters. Return to the Filter drawer and click the '➕ Add Filter Criteria' button.

- As in the previous section, chose the field you would like to apply to your filter and add a value to the filter. In the animated GIF below, we will 'add filter criteria' for State = CO (Colorado).
Once the Filter is applied, you will see only the Transactions that fit the Filter Criteria you added. The animated GIF below shows the Transactions that fit.
- Additionally, since Filters work the same in both the Table view and Pipeline view, you can switched between them and maintain the applied Filters, as demonstrated in the animated GIF below.

👍 This concludes adding multiple filters to your transactions.
Remove Filters Applied
- If there are one or more Filters applied, a number next to 'Filters'. Click the 'Clear all' button to remove the filters currently applied.

- By clicking the 'Filters' button, we can adjust or add to the Filter - or click the 'Clear all' button to clear the filter(s). Then click the 'Apply' button.

- At this point, you should see no number next to the Filters button. This means that no Filters are applied.

👍 This concludes removing filters that were applied to transactions.