Copy One or More Automations from an Existing Team
Admins have a couple of powerful ways to build and distribute automations. One of those is through the Team Automation Copy feature—ideal when you need to duplicate one or more automations from a single team to others.
We'll be concentrating on the 'Team Automation Copy' functionality. This is a different way of copying than Automation Management, but works in a familiar way.
The 'Team Automation Copy' function will allow for copying all automations in a single team to one or more teams at a time. Therefore, to begin, we will start by creating a team who's sole purpose is for copying automations. We'll then copy all automations from the source team, delete the automations we do not need and finally, copy the isolated automation(s) to each team we want to have the new automation(s).
You must be logged in as an administrator to access Enterprise Management, where the team management tools live.
These are the steps we'll demonstrate.
- Create New 'Copy' Team
- Copy Automations from Source Team
- Delete Unneeded Automations
- Copy Automation(s) to Team(s)
- Activate Automations

1 - Create a New 'Copy' Team
The reason for creating a new team is that copying automations from team to team will copy all automations from the source team to the destination team(s). By creating a 'copy' team, we can copy all the automations from the source team, delete the automations we do not wish to copy, then we can copy only those automations we want.
Creating this new team is only necessary once. The team can be used as often as needed for copying a single or multiple automations from one team to another.
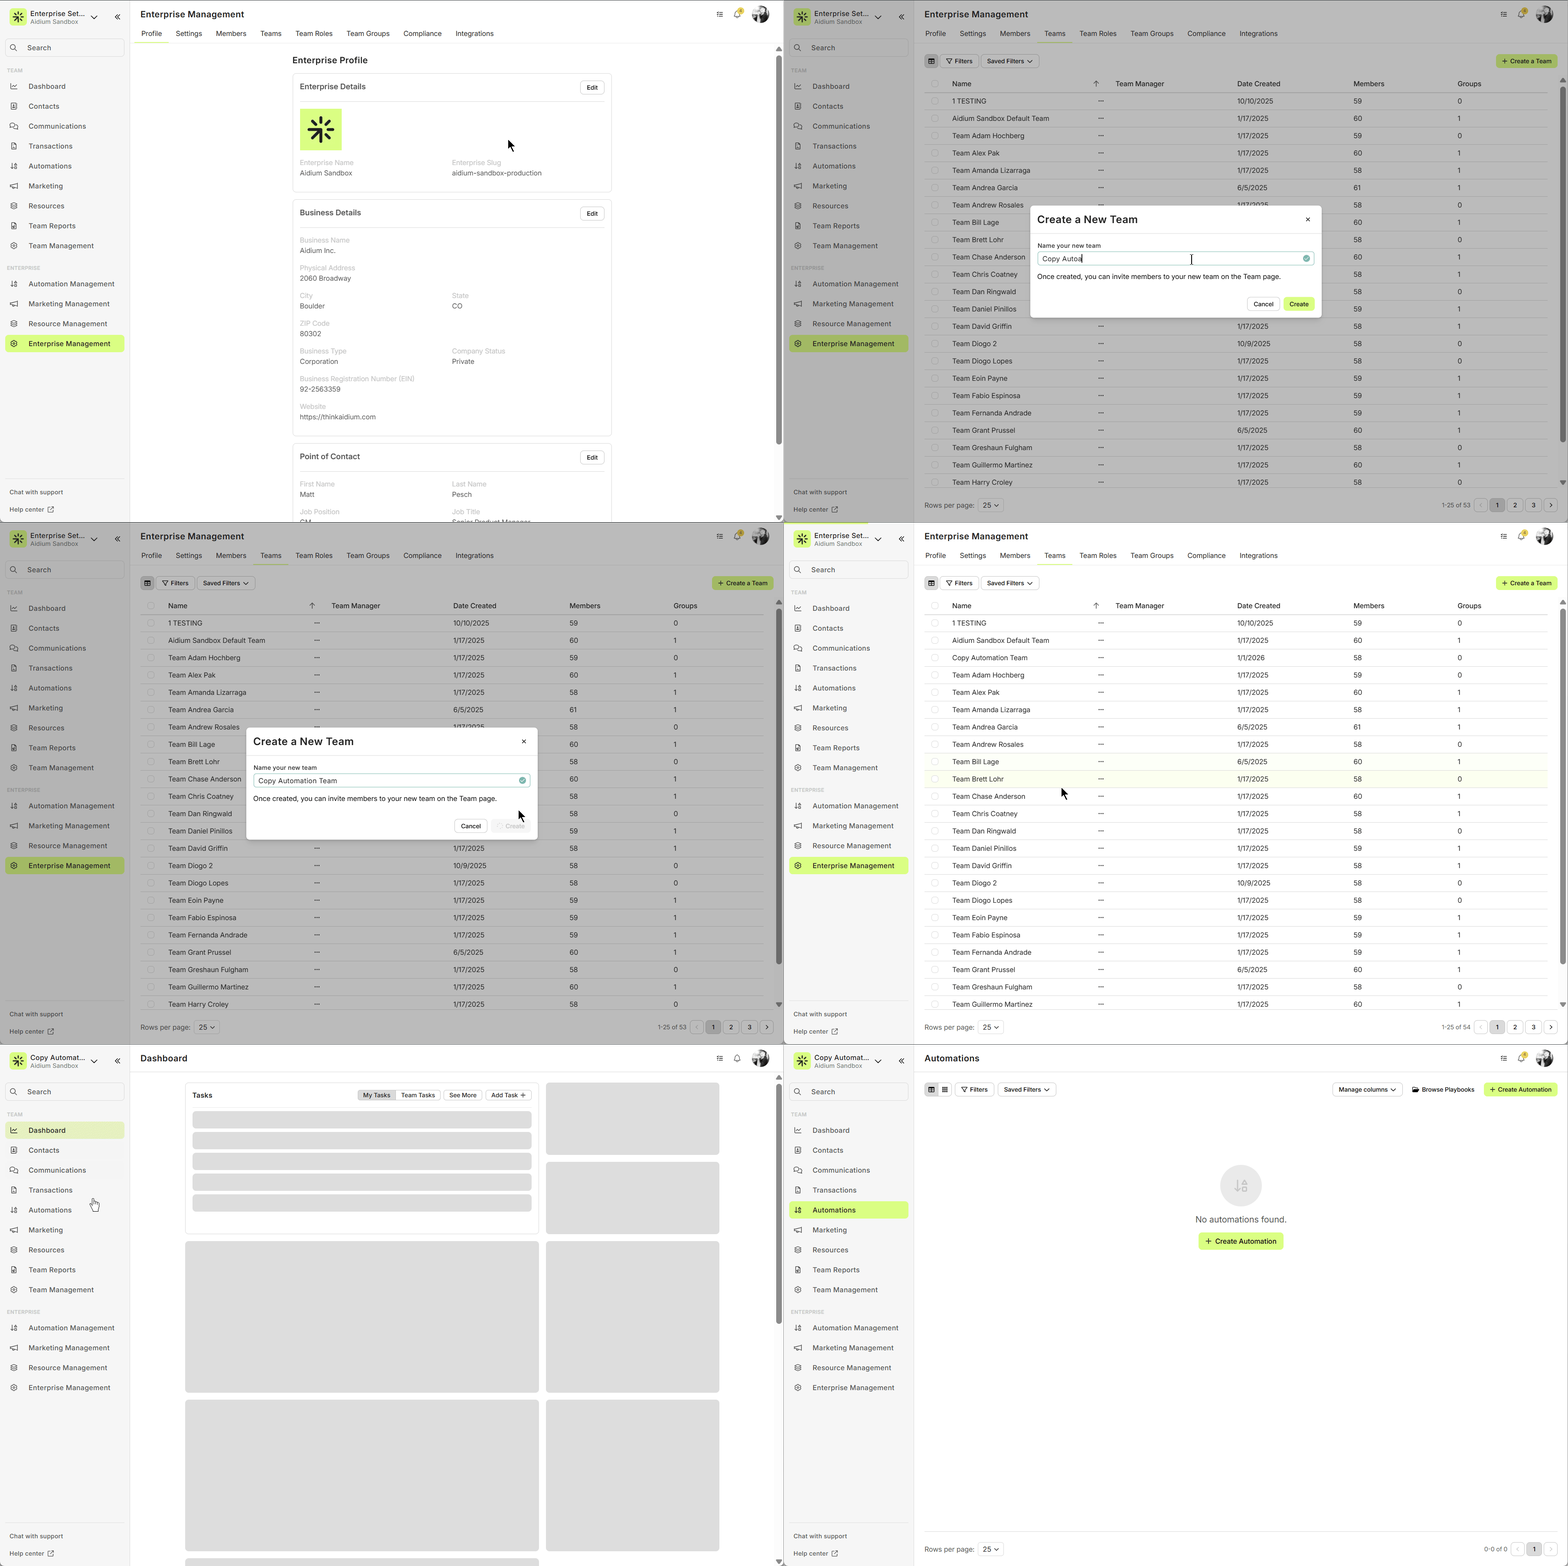
- To begin, we'll click on the top-left Team name and choose, 'Enterprise Management'.

- Next, click on 'Teams' on the horizontal menu, then '+ Create Team' at the top-right.
- Then, we'll give our team a name. In this case, we add a symbol or letter that will allow it to be at the bottom of the list of teams alphabetically. This will help segregate it from active teams. Once we're happy with the name, click 'Create' in yellow.
- Once we refresh our browser, we'll see the new 'copy team' in the top-left drop-down list.
👍 This concludes creating a new copy team. Remember, once we have an automation copy team, we won't need to add it again.
2 - Copy All Automations from the Source Team
Now that we have a placeholder team for copying automations. We will copy all the automations from our source team. In this case, we're going to copy all automations from team, "1 TESTING" and copy them to "Copy Automation Team".
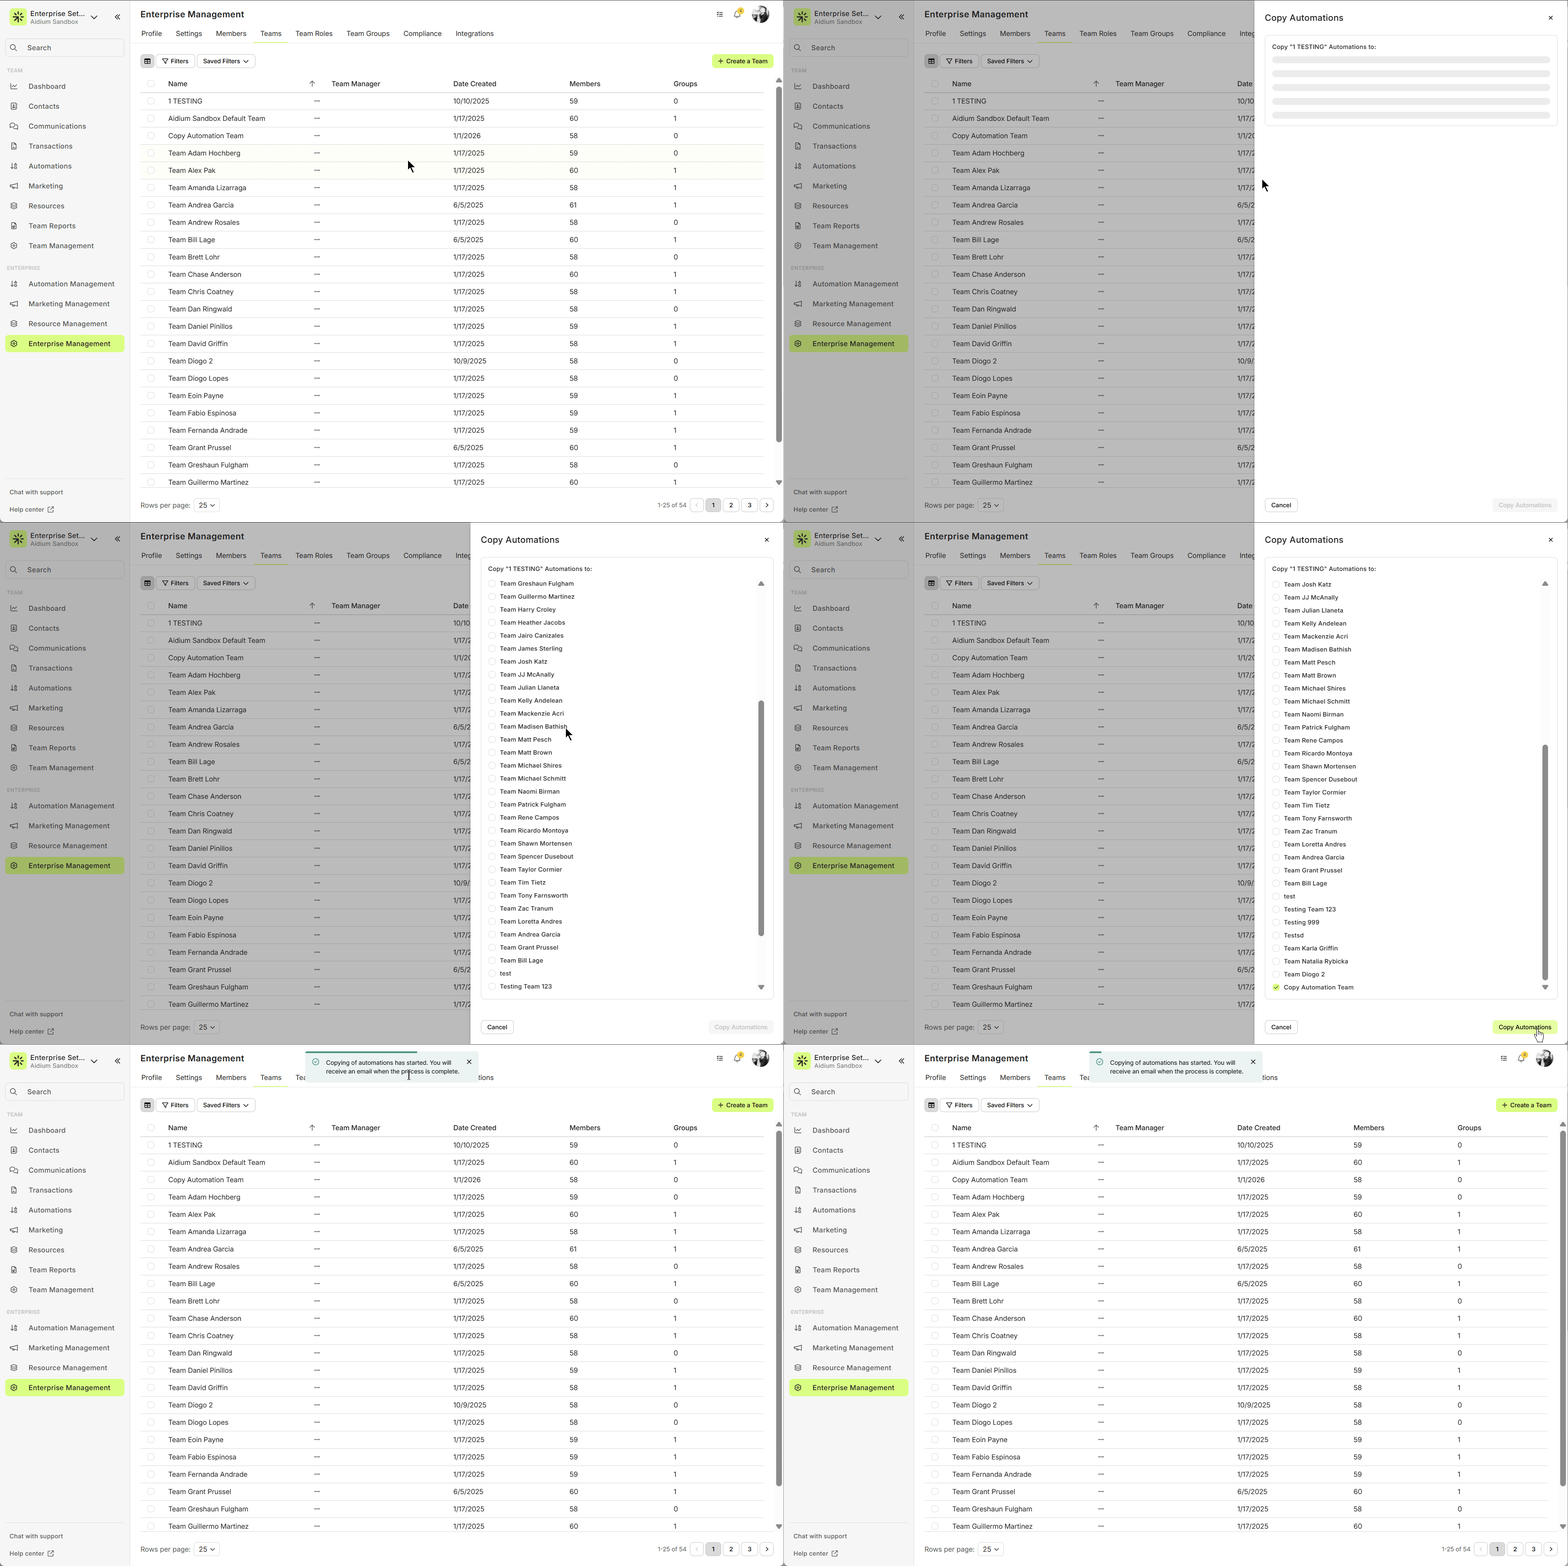
- To initiate the copy, we'll go back to 'Enterprise Settings', then click on 'Teams' again.
- Next, we'll click the three dots [...], also called an ellipsis, next to "1 TESTING". Then, choose 'Copy Automations to Team(s)'.
- After clicking, the 'Copy Automations' drawer will appear. In this case, we simply want to choose our copy team, "Copy Automation Team". Once we check that team, we'll click the 'Copy Automations' button. When complete, we'll receive an email confirmation to the email address we're logged-in with.
👍 This concludes copying of all automations from the source team
3 - Deleting the Unneeded Automations
Since the 'Team Automation Copy' feature will copy all automations from the source team, we'll next delete any of the unneeded automations. Then we can copy to as many teams at once as we'd like.
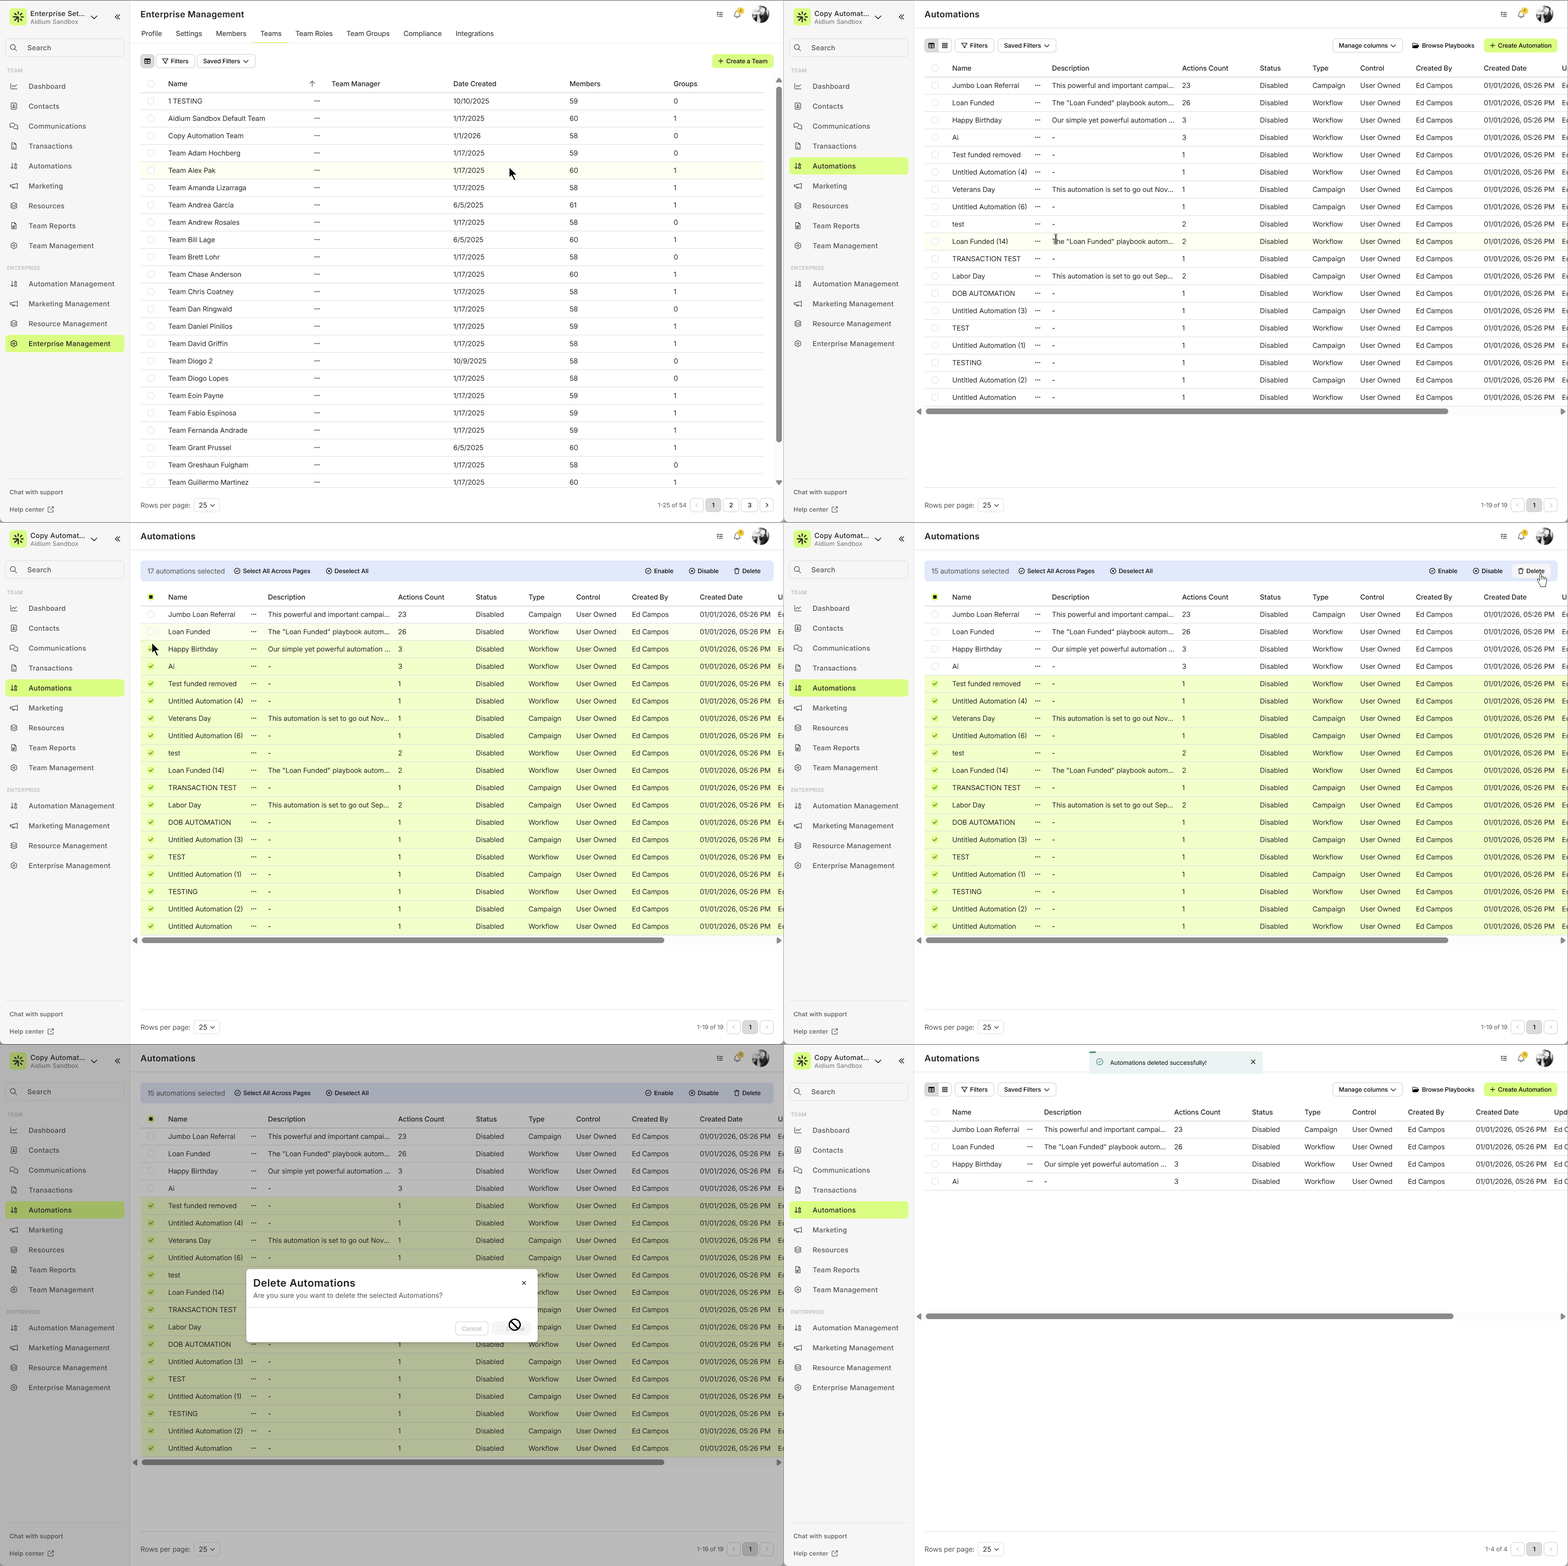
- First, we must go to the team we just copied the automations to, "Copy Automation Team"
- Once the copy team loads, we'll go to Automations from the left menu group.
- Now it's time to delete all automations, other than the one(s) we want to copy to other teams. Most likely, it will be easiest to begin by selecting all automations. Then, de-selecting the one(s) we want to keep. Finally, we will delete the selected automations.
- At this point, we have just two automations - which are the automations we wish to copy to other teams.
👍 This concludes deleting the unneeded automations before copying to other teams.
3 - Copying the Automation(s) to Team(s)
Now, we have only the automations we wish to copy isolated in our new 'copy team'. We will copy those automations, like we did above in step 2, to the target teams.
- To initiate the copy, we'll go back to 'Enterprise Settings', then click on 'Teams' again.
- Next, we'll click the three dots [...], also called an ellipsis, next to "Copy Automation Team". Then, choose 'Copy Automations to Team(s)'.
- After clicking, the 'Copy Automations' drawer will appear. In this case, we simply want to choose each team that should receive these automations. Once we check each of those teams, we'll click the 'Copy Automations' button. When complete, we'll receive an email confirmation to the email address we're logged-in with.
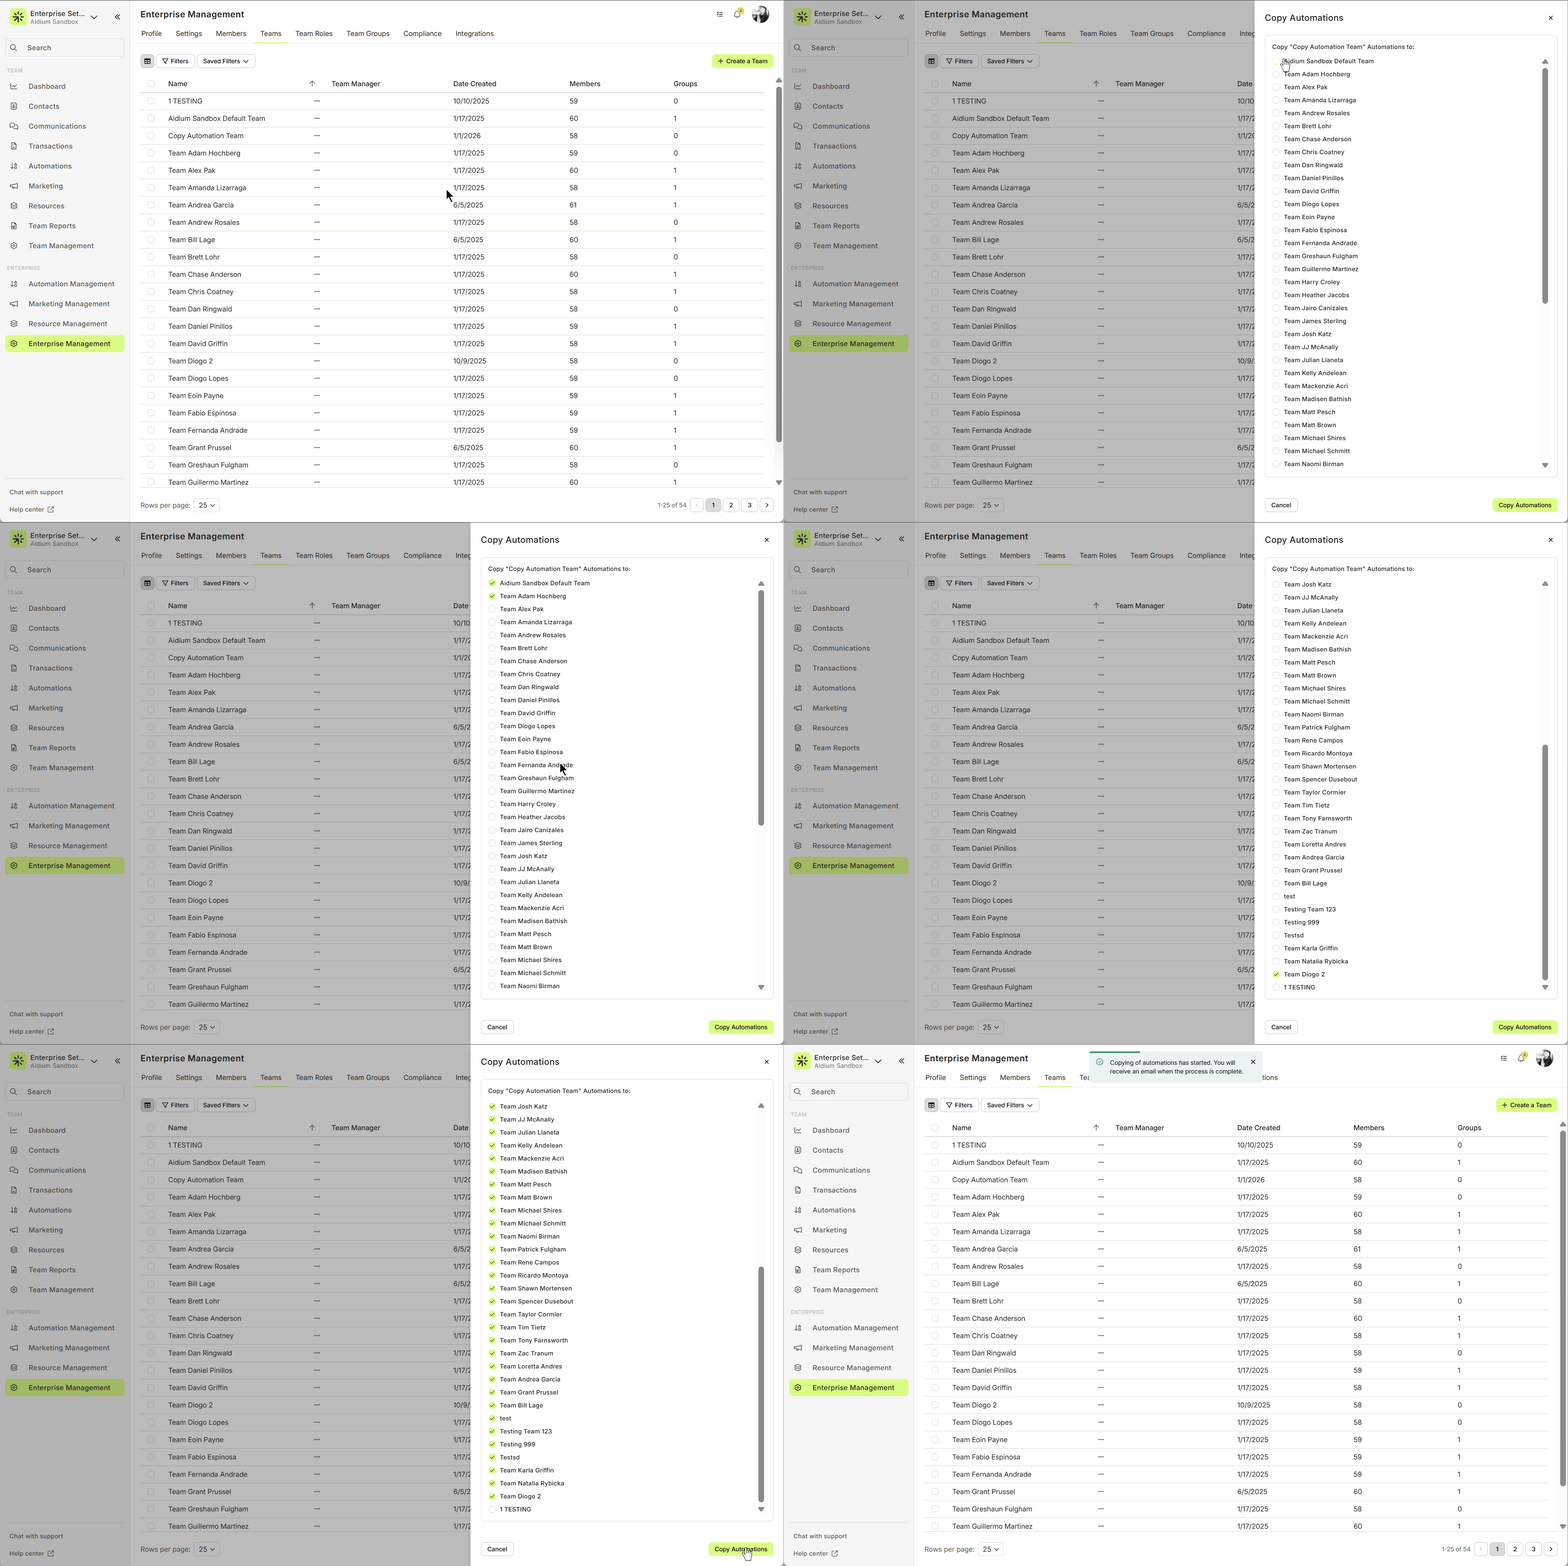
Since we originally copied these automations from "1 TESTING", we do not want to copy them back. They already exist in that team.
👍 This concludes copying the automation(s) to team(s)
5 - Activating the Newly Copied Automation(s)
Now that the automations have been copied to each of the teams we selected. It's now time to go into each team to 'Activate' the automations.
- First, we'll go to one of the teams we just copied the automations to. It's usually best to start at the top and work our way down.
- Once the copy team loads, we'll go to Automations from the left menu group.
- Next, we'll simply select each of the new automations and enable them, as seen in the below animated GIF.
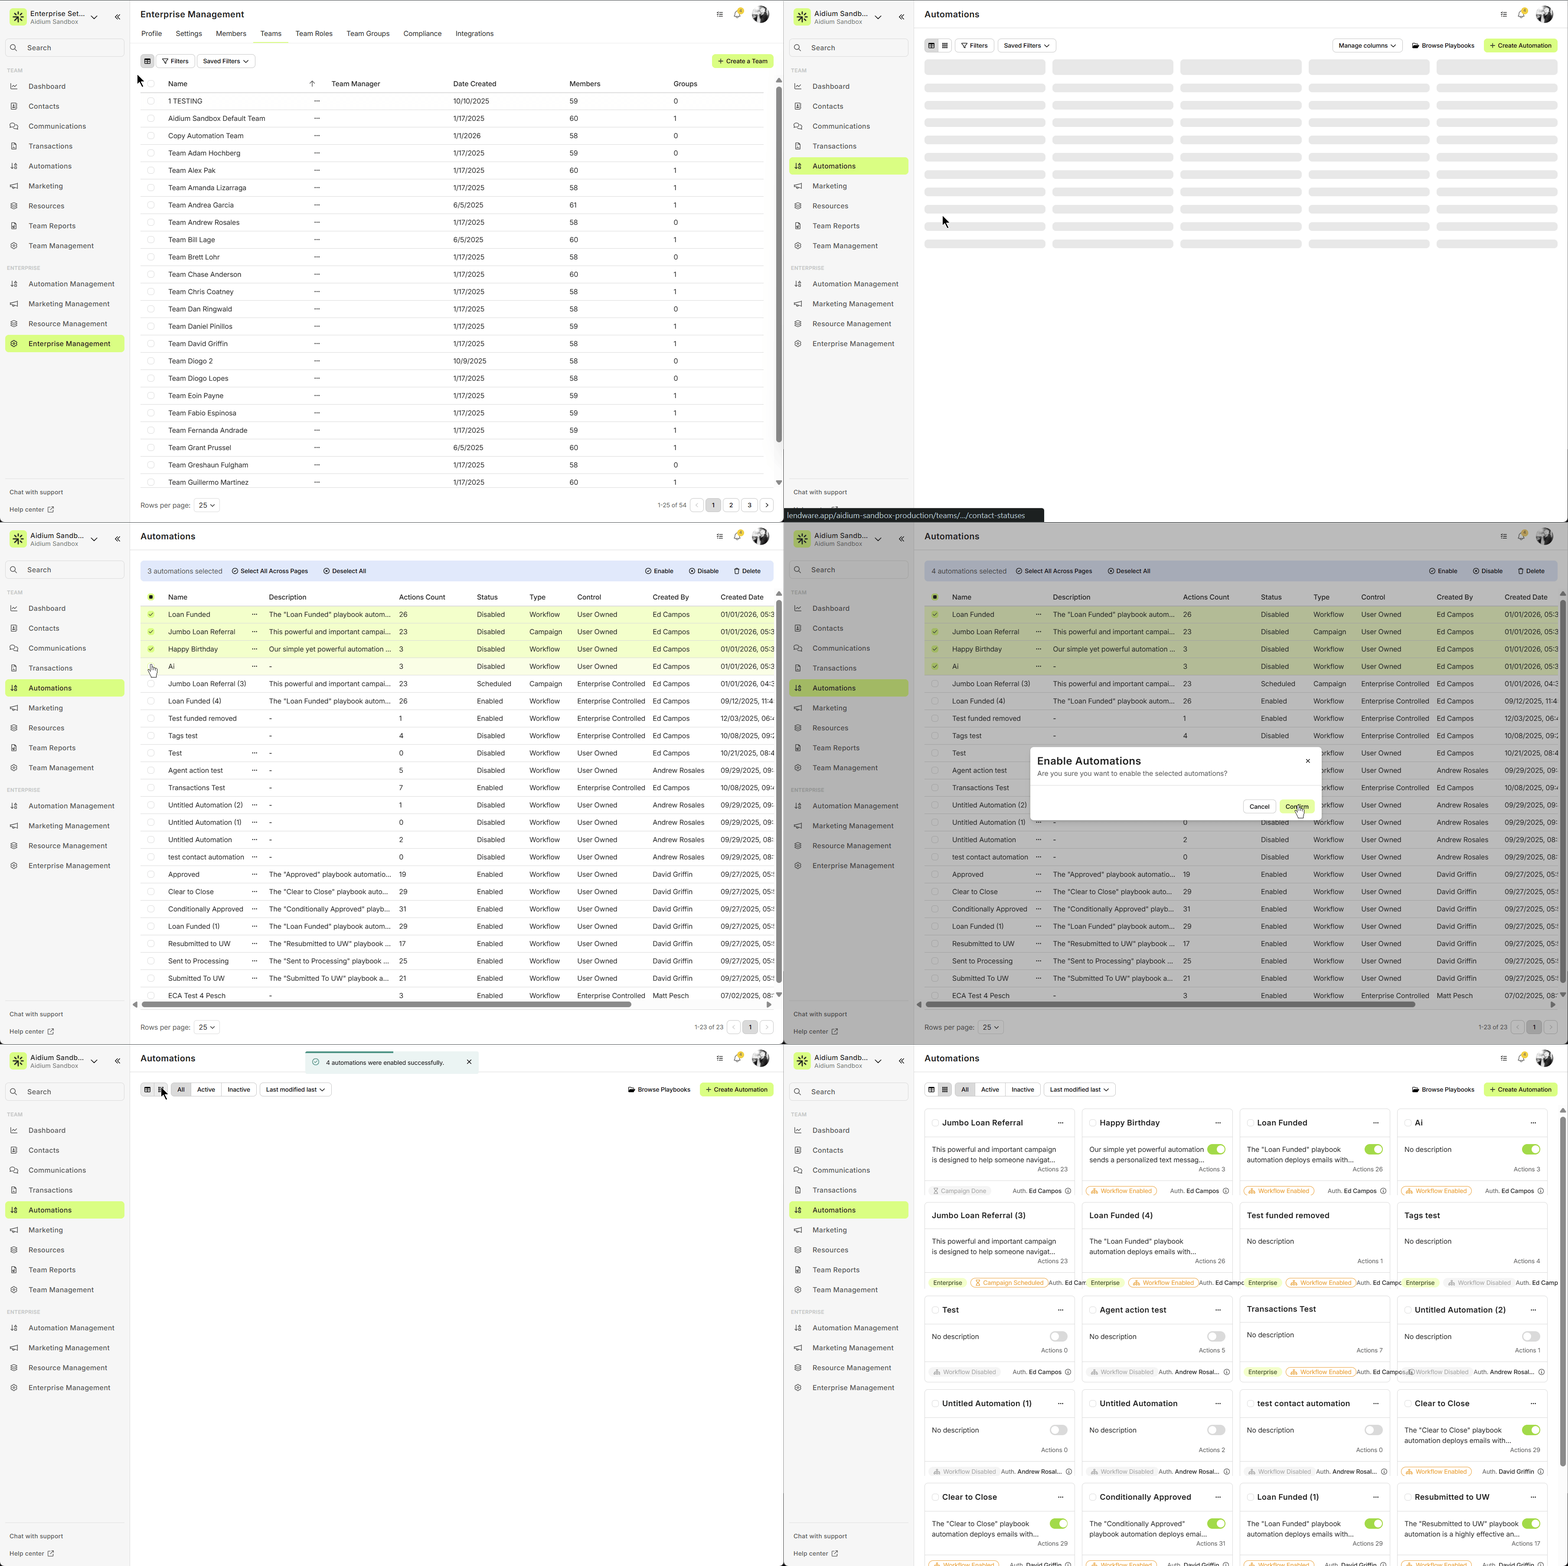
- Then, we'll go into each subsequent team that was copied to and follow the same steps above, until all teams have their new automations active.
👍 This concludes activating the newly copied automations in each team.