Out of the box, Lendware sends all Automations using SendGrid - this includes your company's Nurture or Drip Campaigns, Scheduled Newsletters and just about any other outbound marketing emails. Not only does this provide higher delivery rates and higher throughput for nurture and marketing communications, but also allows for opt-out capture and future link tracking and open rates.
To ensure high-quality delivery, easy identification of sender and seamless response, Lendware sends (by default) from a hidden custom email address with quality and compliant email headers that provide the sender's full name and direct reply-to.
While this method helps ensure the highest delivery rates in our industry, many companies will prefer to take advantage of our premium email experience by sending from their own fully authenticated domain name using custom DNS records provided by Lendware.
- Definitions
- Setup New Sending Domain
- DNS Provider Formatting, Troubleshooting & Help Resources
- Setup Additional Domains
- Delete Domains
- Walk-through Video - Using GoDaddy
Watch this video for an explanation of how emails are sent from Lendware and the benefits of setting-up an Enterprise Domain. (3-min)
Definitions
Before beginning, we will first set a few definitions:
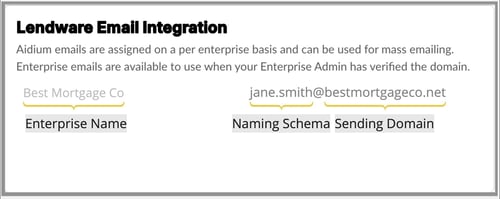
- Lendware Email - Auto-generated email address for sending via Automations and Mass Actions. The email address is generated automatically for each user upon setup and based on your Enterprise name.

- Enterprise Domain - Vanity domain that matches a company's standardized email schema. Matches the sending email address from company email server for each Lendware user.
- DKIM - DomainKeys Identified Mail - is an email authentication protocol that creates a digital signature that mailbox providers use to verify the identity of an email sender. In our case, it's a few DNS records added to the sending domain.
- DMARC - Domain-based Message Authentication, Reporting & Conformance - This helps domain owners protect their domains from unauthorized access and usage. When using google email services, adding DMARC txt records is highly suggested. Ideally though, DMARC inclusion policy should always be employed by IT/IT-Sec teams.
- SendGrid - A popular and secure API based mass email sending service. Lendware sends all mass email and contact nurture email through SendGrid, rather than using a company's email integration. This ensures the highest email discoverability and avoids overwhelming or pre-set limits on company email servers.
When sending Lendware emails via SendGrid, the email header is automatically and compliantly prepared with a reply to with the user's login email and with the user's full name as the display name. This provides a near seamless interaction from the email recipient. Each email will display the sending User's name with a reply to matching the User's email address.
⚙️ Note: Direct 1:1 emails (ad-hoc messages) are sent through a user’s connected inbox, not through SendGrid.
Setup New Sending Domain
Adding and setting-up a new sending domain is incredibly straight-forward. It is highly recommended that a company's IT department is fully aware and involved in setting up an Enterprise Domain in Lendware.
⚠️ Before beginning, the Lendware Administrator must have access to the name servers and ability to add new DNS records on the sending domain.
🚧 Updating or deleting DNS records incorrectly or inadvertently can cause unexpected behaviors in existing systems. This process should not be handled by anyone that does not have direct experience and full understanding of DNS, Name Servers and the existing records on the domain to be updated. It is always recommended to backup all DNS settings before making changes. Lendware is not responsible for any adverse results from this process.
Always consult your organization's CTO or IT management company to assist before making any change.
Steps
- Log in to Lendware.app as an Enterprise Admin.
- In the left-hand menu, click Enterprise Management.
- Select Settings.
- Go to the Enterprise Domains section and click Add Domain.
- Enter your domain (example:
yourcompany.com) and click Add Domain. - A slide-out will appear on the right. Type or paste the sending domain carefully before clicking the 'Add Domain' button. Do not include anything other than the domain itself.
- After adding the new sending domain, three new DNS CNAME records will be provided. Each will need to be added to the sending domain's name servers for resolution. Use the copy button next to each portion of the record to ensure a perfect copy.
The TXT "DMARC" record is optional and if there is already a DMARC record for the domain, it should not be updated.
- Using GoDaddy in the below example, we added each new record individually. If you require assistance with adding or updating DNS records, consult the available support at your domain registrar or name server provider.

- The above image is for demonstration purposes only. Not all name server services look or act the same. Be sure to consult their respective documentation or platform support.
If using GoDaddy, remove the domain at the end of the 'Name' value - "s1._domainkey"
Watch the walk-through video below for step-by-step GoDaddy instructions. - Once the new DNS records are added and up to 20 minutes have elapsed, we clicked the 'Verify Records' button. If the new DNS records have fully propagated, we'll receive a green 'Valid' confirmation next to each record.
If a record is not yet verified, either waiting longer or double-checking each pending DNS record on our recently updated name servers will be required.
- At any point, we can click the 'Save & Exit' button on the Enterprise Domain DNS slide-out. Re-verifying can be done later by coming back to the Enterprise Domain page.
When first three records are marked as 'Verified' in Lendware, each user can setup their own account to begin to send automated/bulk emails using the Enterprise Domain, rather than the Lendware email. Click here to see the steps a user can take to enable sending from the enterprise domain.
📨 Basic DMARC is provided for use. However, a complete DMARC policy and 'txt' record are ideally maintained by IT/IT-Sec team. DMARC is not required, but a recommended industry standard way to help protect the reputation of your email sending domain.
⚠️ DNS Provider Formatting Differences (Important)
Many DNS providers automatically append your root domain to DNS records.
If you enter the full hostname (for example, s1._domainkey.yourcompany.com) in providers that auto-append the domain, the record may error or fail verification.
In most cases, you should enter only the subdomain portion.
Common DNS Provider Formatting Guide
| DNS Provider | What to Enter in the Name / Host Field | Notes |
|---|---|---|
| GoDaddy | s1._domainkey |
Automatically appends the domain |
| Namecheap | s1._domainkey |
Do not include .yourcompany.com |
| Cloudflare | s1._domainkey |
Uses relative record names |
| Google Domains / Google Cloud DNS | s1._domainkey |
Domain is appended automatically |
| AWS Route 53 | s1._domainkey |
Relative to the hosted zone |
| Other DNS Providers | Varies by provider | If unsure, remove the root domain |
📌 Tip: If you see a duplicated domain (e.g. yourcompany.com.yourcompany.com), remove the domain portion from the record name.
Helpful Information & Troubleshooting
If your DNS records fail to verify or your provider shows an error:
- Ensure the domain name is not duplicated
- Remove
.yourcompany.comfrom the Name / Host field - Confirm the record type (CNAME or TXT) matches Lendware’s instructions
- Wait 5–20 minutes before clicking Verify Records again
DNS behavior varies by provider. If records still do not verify, consult your DNS provider or IT team.
Official DNS Provider Help Resources
If you are unsure how your DNS provider formats records, use the official documentation below:
| Provider | Documentation |
|---|---|
| GoDaddy | Manage DNS records |
| Namecheap | How to set up DNS records for Namecheap |
| Cloudflare | Manage DNS records |
| Google Cloud DNS | Set up DNS records for a domain name with Cloud DNS |
| AWS Route 53 | Configuring Amazon Route 53 as your DNS service |
💡 If you have any questions, you’re always welcome to reach out to our team. However, since DNS configurations can vary by provider, it’s usually best to confirm any remaining details directly with your DNS provider or internal IT team.
Setup Additional Enterprise Sending Domains
To allow for multiple brands/logos across a single Enterprise, we also offer the ability to setup additional sending domains. Often each team or division may have their own vanity domain for their team or local branding. By setting up additional domains, each team that wants it, can send emails from their own vanity domain.
Overall, the process is the same as adding the first custom sending domain. In Enterprise Settings, then Setting Page, in the Enterprise Domain section, we'll click the 'Add Domain' button. Enter the new domain and follow the same process in the section above.
In the animated GIF below, we'll show the initial setup when a previously added domain exists.

To complete the process, follow the steps in the section above.
⚙️ When multiple domains are set up in an enterprise, users are able to verify an address on any of those domains to send automated and mass mail from. However, only one email can be setup per user.
Deleting a Domain
Sometimes deleting a domain is required. To do so, simply return to Enterprise Settings, then Setting Page. Finally, in the Enterprise Domain section, simply locate the domain to be removed and click the 'trashcan' icon (to the right of that domain).
In the below animated GIF, we're prompted with a confirmation window. We will type or paste the domain into the confirmation box and choose Delete. This domain will no longer be available for use and any User who had it setup as their sending domain can now choose a new domain. No action on the user's part will revert to the default sending schema outlined at the top of this article.

⚙️ On the 'Delete Enterprise Domain' confirmation dialog, it will provide the number of current users who have their email setup to use that enterprise domain. If any users are setup to use email on that domain, it will automatically remove their access to sending from that domain.
Video Walk-through of initial Enterprise Domain Setup
👍 This concludes the setup of Enterprise Domain for sending email