Control Automations for Teams and Groups
Not every automation in Lendware needs to apply to everyone. Sometimes you want a campaign to run for your Sales Team but not for Operations, or you want workflows to be visible only for specific user groups. That’s where Team and Group Controls come in.
This feature allows you to decide who has access to an automation and ensures the right people are enabled while keeping others out. By carefully assigning automations, you can reduce clutter, maintain security, and make sure each team is only running what’s relevant to them.
Choose Teams or Groups
You’ll find this feature directly inside Automation Management. When configuring, you’ll first select whether to control the automation for Teams or Groups.
-
Teams: Apply the automation to specific teams.
-
Groups: Apply the automation to team groups.
⚠️ Switching between Teams and Groups will clear your current selection.
Controlling by Teams
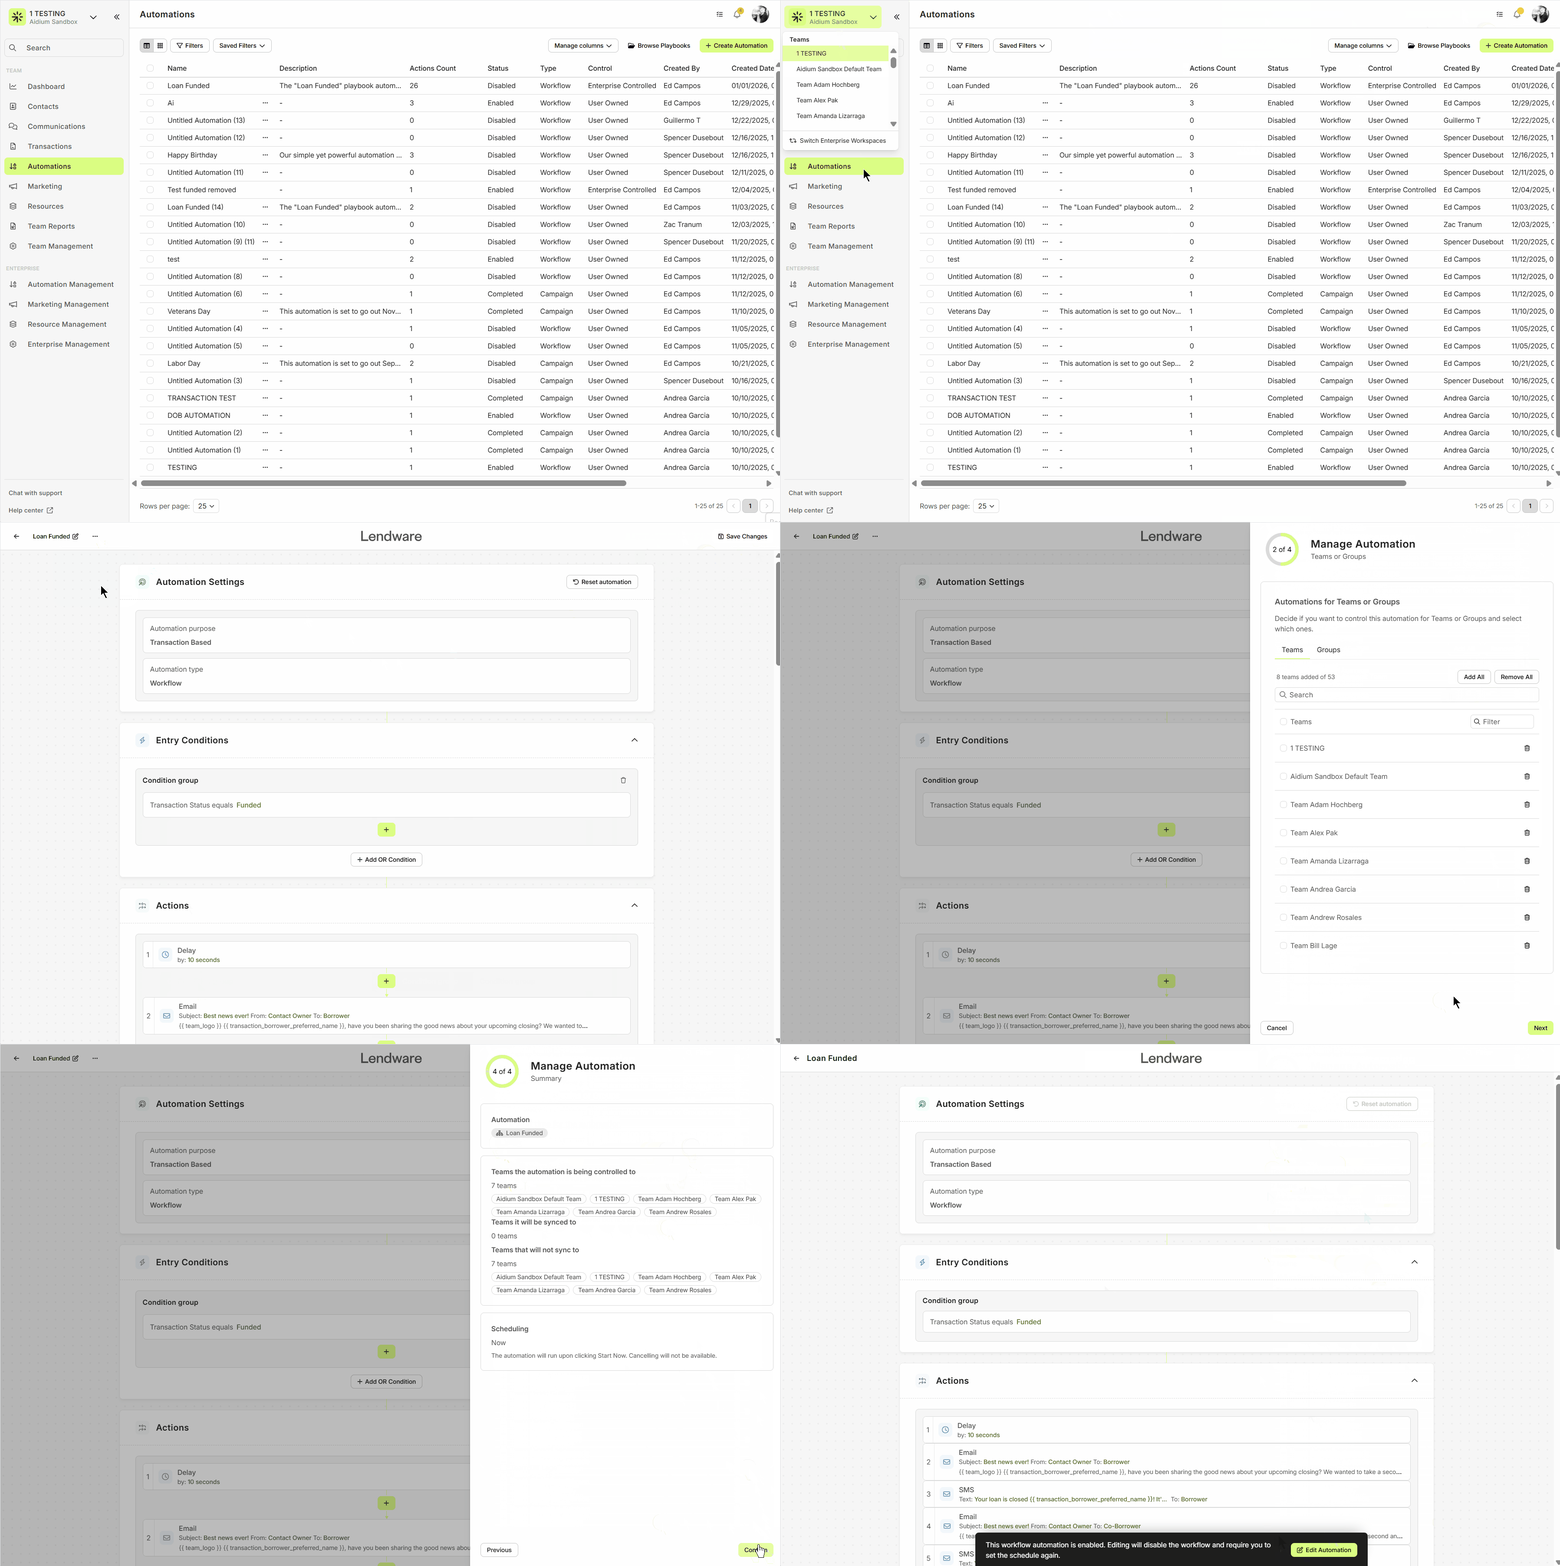
When choosing Teams, you’re assigning automations to structured organizational units (for example, “Florida Branch” or “Processing Team”).
-
You can Add All Teams to make the automation visible across the entire organization or selectively add only the ones you need.
-
Each team appears in the list disabled by default, giving you control over when to activate it. Simply toggle the setting to enable it.
-
If a team shouldn’t have access, just click the trash icon to remove it from the automation.
-
When you confirm, Lendware provides a clear summary showing:
-
Teams where the automation is active.
-
Teams where the automation remains disabled.
-
This ensures you always know exactly who’s impacted before moving forward
Step by step: Configure for Teams
Here’s what you’ll see:
-
Options: Add All | Remove All | Search
-
Add All: Adds the automation for every team, making it visible to all.
-
Remove All: Removes all currently selected teams.
-
Search: Helps you find and select a specific team.
Once you add a team:
-
It appears in the list below.
-
By default, the automation is disabled for that team.
-
You can enable it with one click.
-
Use the trash icon to remove it.
When you click Next, you’ll see a summary:
-
Teams the automation is being controlled to
-
Teams it will be enabled on
- Teams it will be disabled on
Then simply confirm your selection, and you’ll be able to see it visible in your Teams.
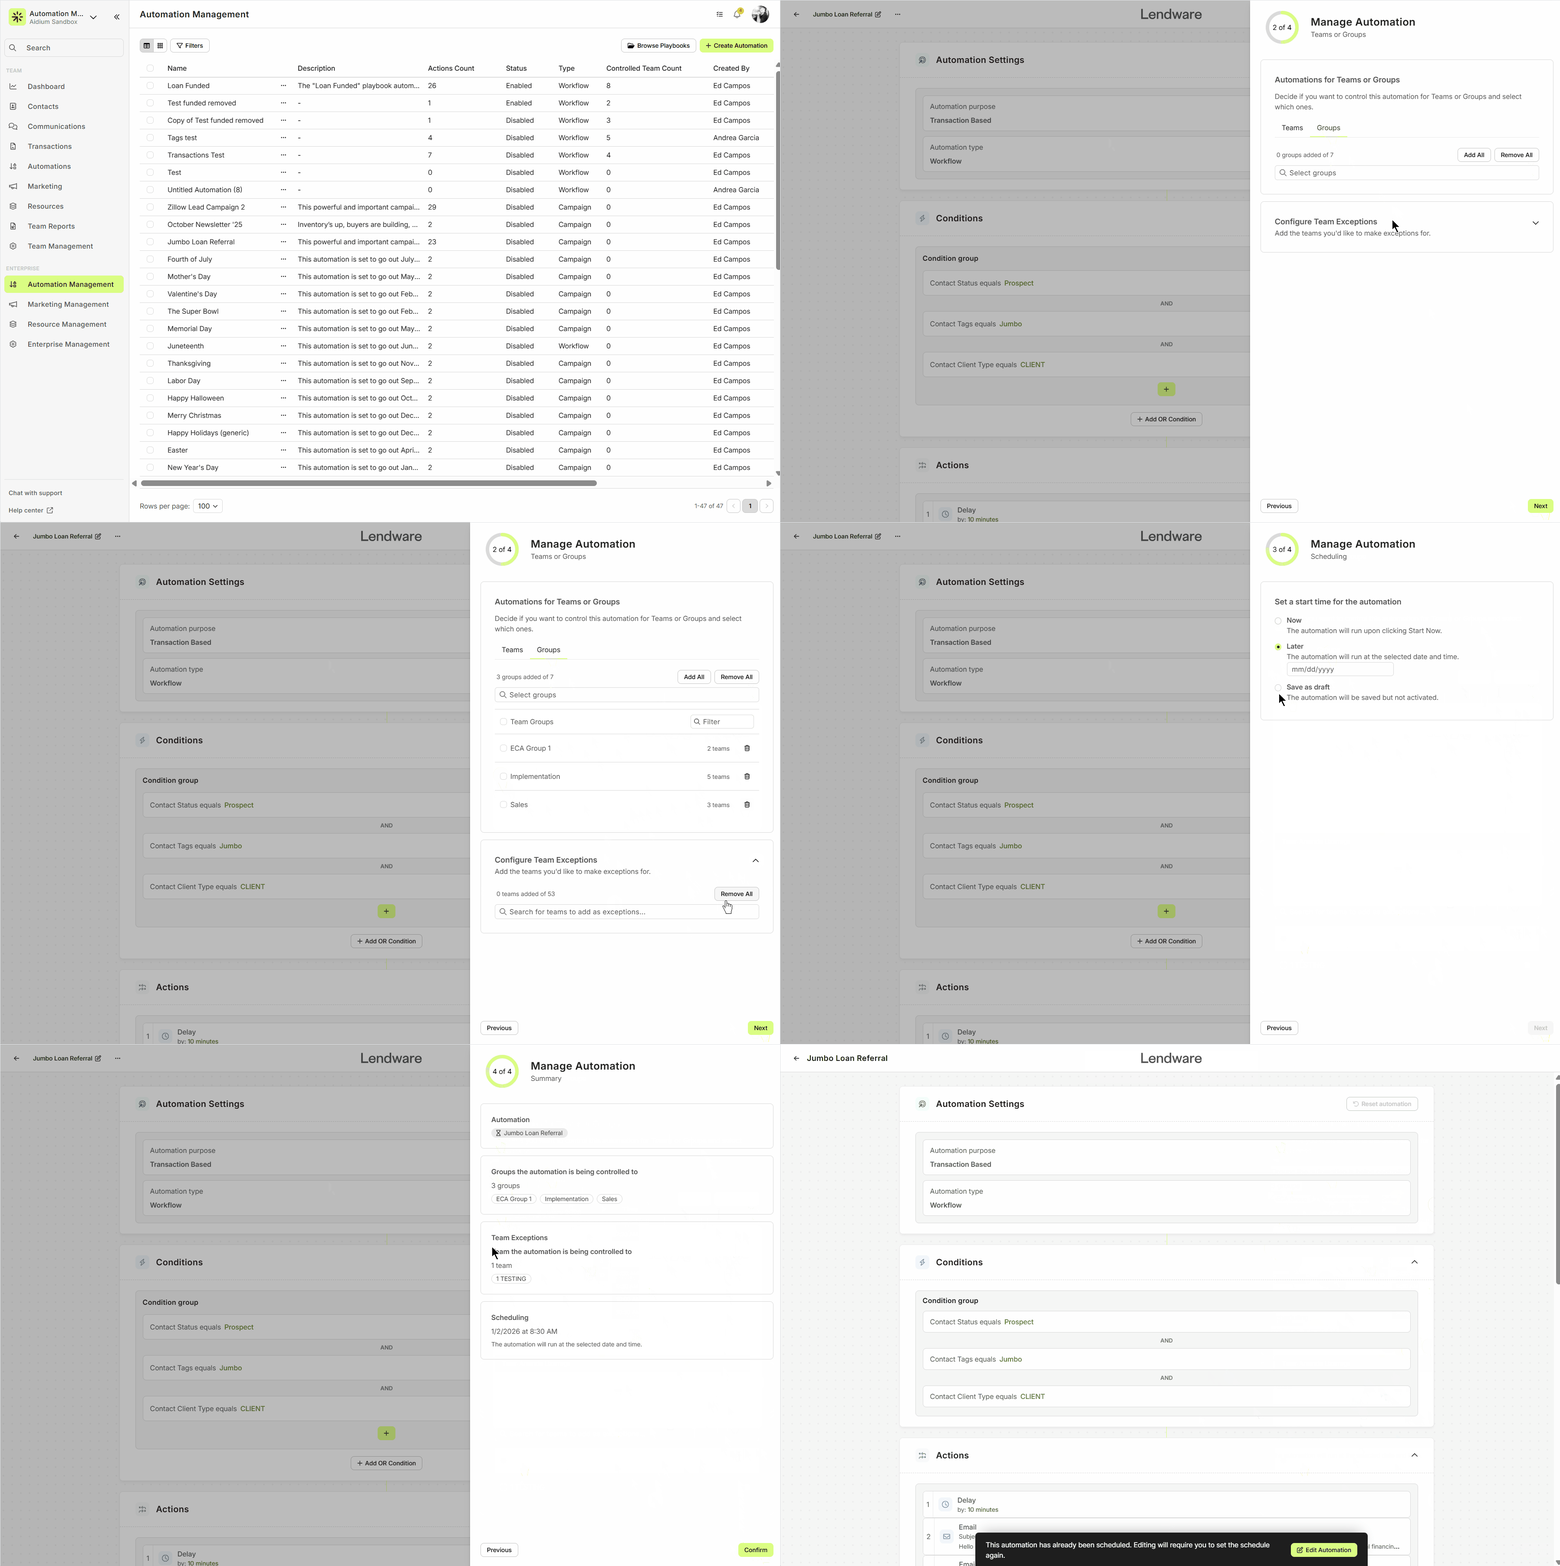
Controlling by Groups
Groups allow you to control automations based on roles, permissions, or categories (e.g., “Loan Officers,” “Assistants,” or “Managers”), rather than entire departments. This gives you more flexibility when automations should follow responsibilities instead of team structures.
-
Just like with Teams, you can Add All, Remove All, or search and select groups individually.
-
Automations also appear disabled by default and must be manually enabled.
-
Unique to Groups, you can configure Team Exceptions. This is useful when most teams within a group need access, but one or two should be excluded. For example: all Loan Officers in the “East Region” group may need an automation, except for the Training Team.
When confirmed, you’ll see a summary that outlines:
-
Groups the automation applies to.
- Groups where it’s enabled.
-
Groups where it’s disabled.
-
Any exceptions you set for Teams inside those Groups.

Step by step: Configure for Groups
The process is almost identical to Teams, but applied to groups.
-
Use Add All, Remove All, or select individual groups.
Each group added will:
-
Appear in the list as disabled by default.
-
Be enabled with one click.
-
Have the option to be removed with the trash icon.
Before confirming, you’ll see:
-
Groups the automation is being controlled to
-
Groups it will be disabled on
Set Exceptions for Teams
Need more control? Use Team Exceptions.
-
Add the teams you want to exclude from the general setting.
-
Exceptions can also be enabled or removed.
-
Once confirmed, these exceptions appear in your summary.
How Exceptions Work
Exceptions let you fine-tune access by making sure a specific Team inside a Group can override the default control. For example:
-
If a group has the automation enabled, you can use an exception to keep one team disabled.
-
If a group has the automation disabled, you can use an exception to keep one team enabled.
This flexibility ensures no team is left out (or forced in) unintentionally, even when groups are broadly controlled.
⚠️ Important Notes
-
Switching between Teams and Groups will reset your current selections. Make sure you confirm your choice before moving forward.
-
Both Teams and Groups are created and managed under Enterprise Management, but the control of them within automations happens inside Automation Management.
-
In Automation Management, any automation with control enabled will display as Controlled.
-
Within each Team, these automations are marked as Enterprise and are not editable locally. They can only be modified in Automation Management.
Teams vs Groups – Quick Comparison
| Option | Teams | Groups |
|---|---|---|
| Scope | Department or branch-level units (e.g., Sales Team, Processing Team). | Role- or permission-based categories (e.g., Loan Officers, Assistants). |
| Selection Options | Add All, Remove All, or search for teams. | Add All, Remove All, or select groups individually. |
| Default State | Disabled until manually enabled. | Disabled until manually enabled. |
| Exceptions | ❌ Not available. | ✅ Can exclude specific teams from group access. |
| Best For | Department- or location-based control of automations. | Role-based control with flexibility to fine-tune access. |
Why This Matters
By controlling automations through Automation Management, you can:
-
Keep automations relevant — only the right people see and use them.
-
Maintain consistency — ensure specific departments or roles always get the same automation logic.
-
Stay flexible — with Group Exceptions, you can adapt without having to rebuild or duplicate automations.
Use Teams when you want department- or branch-level control.
Use Groups when you want role-based control with the added power of exceptions.
Need more help? Check out: Copy Automations to Teams with EAM
