Because the playbook uses a merge‑field link to your partner‑consent form, users must create a User Custom Field named “Co‑Marketing Consent Link”. Without this field the merge tag won’t resolve, and you’ll have to manually edit the HTML in the email template—defeating the purpose of a no‑code playbook. Follow the steps below carefully!
☝️ Heads‑up: Opening or editing the playbook’s email will break the email. Once you copy the playbook to your team, resist the temptation to click into the playbook email; if you need changes beyond the merge link, contact support or your Lendware representative.
1. Prerequisites
Create a User Custom Field (“Co‑Marketing Consent Link”)
Lendware’s Enterprise Management lets admins add custom fields for users. These fields provide merge tags you can drop into emails and SMS to personalize content. To set up the Co‑Marketing Invite playbook:
-
Log into Lendware as an Enterprise Admin.
-
Navigate to Enterprise Management → User Custom Fields.
-
Click “+ Add Custom Field.”
-
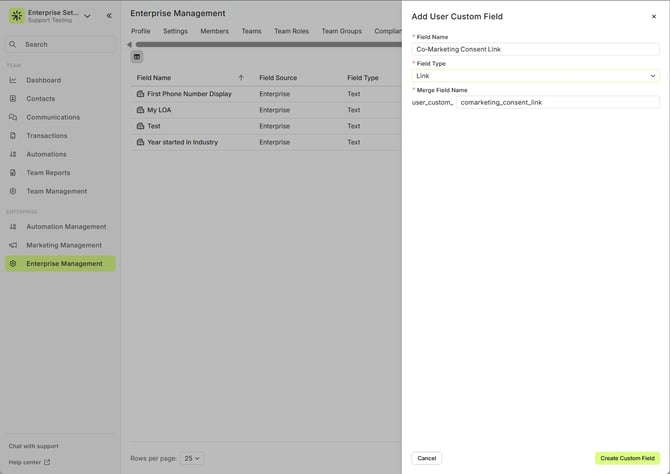
Fill in the details:
-
Field Name:
Co‑Marketing Consent Link(make the name clear so users know what it stores). -
Field Type: choose Link; for this playbook use Link to store a URL.
-
Merge Field Name: set to
user_custom_comarketing_consent_link(Lendware auto‑generates this, but you can edit it now). Remember: once created, the Field Type and Merge Field Name cannot be edited.
-
-
Click Create Custom Field.
Your new field is now available as a merge tag in emails and SMS. If you don’t set up this field exactly as shown, the playbook’s email button will not work. In that case you’d need to dive into the email HTML and replace the merge tag manually—a hassle that defeats the no‑code approach.
Build a Co‑Branding Consent Form
Lendware’s Forms (a Beta feature) allow you to capture leads and partner consent for co‑marketing. You’ll use a Co‑Branding Consent form to collect partner information and marketing consent:
-
In Lendware, go to Marketing → Forms and click “+ Create Form”.
-
Choose the type:
-
Co‑Branding Consent – collects partner info (first/last name, email, phone numbers, job title, profile photo).
-
-
Optionally set Contact Status and Tags for submissions.
-
Click Create Form. Lendware will display an Embed Code. Copy this; you can embed it into an external site. You can also create a Marketing Site within Lendware and use the form in this new site. See instructions below for creating a Marketing Site.
This consent form is how partners give marketing consent. When a partner submits, Lendware records “Consent Given” on their record and makes their branding selectable in forms.
(Optional) Create a Marketing Site
If you’d like to host your co‑branding consent form on a landing page, Lendware’s Marketing Sites (also Beta) let you create mobile‑responsive pages for property listings, contact capture, or events. Key steps:
-
Go to Marketing → Sites and click “+ Create Site.”
-
Pick a template (Single Property, Contact Us, or Event).
-
Give your site a name and choose a style (Minimalist, Modern or Elegant).
-
In the Form dropdown, select the Co‑Branding Consent form you created. A site cannot be published without a form.
-
Publish and copy the site URL to share in your marketing materials.
You can also embed Lendware forms into external website builders (Weebly, Wix, GoDaddy, WordPress, etc.) by adding the embed code to an HTML block.
2. Installing the Playbook
Lendware’s playbook automations are grouped by category (Lead Conversion, In‑Process, Holidays, Partnerships, etc.) and are fully customizable. To install the Co‑Marketing Invite Consent Request playbook:
-
Access Playbook Automations: On the left‑side menu, click Automations, then click the folder icon next to “+ Create Automation” to open the Playbook Automations page.
-
Find the playbook: In the Playbook categories list, look under Partnerships (or the category specified by Lendware). Hover over the playbook to see a brief description; click See Details for a full preview.
-
Copy to your team: In the preview window, click “Copy Selected Playbook Automations.” This duplicates the playbook into your team’s automation list.
-
Do not open the playbook email. Once copied, enable the automation to make it available. However, Lendware notes that opening the automation to view/edit the email template will break it. Only copy and enable the playbook; if you need modifications beyond the merge link, contact Support.
3. Using the Merge Field in the Playbook Email
The playbook’s email template contains a “Let’s Connect” button which points to your Co‑Branding Consent form. It uses the merge field to dynamically pull the URL from the user profile. When setting up your user profile:
-
Go to Account Settings (click your name in the top right → Account Settings).
-
In the Custom Fields section, paste the URL of your Co‑Branding Consent form or marketing site into the Co‑Marketing Consent Link field.
-
Save your profile.
Now, when the playbook runs, the email will insert the correct link for each user. Partners will click the button, complete the consent form, and the playbook can use that data in future communications.

4. Partner Consent & Dynamic Branding
Lendware’s co‑branding feature supports dynamic branding in forms so both the loan officer (LO) and partner are featured. This feature is currently in Beta and may not be available to all users. Important points:
-
Loan Officer Branding: All team members in the Enterprise can be selected; once chosen, the LO’s name, headshot and contact info update automatically in the form.
-
Partner Branding & Consent: Partner branding is conditional on marketing consent. To check a partner’s consent status, open the partner’s contact record and look under Partner → Marketing Consent; “Consent Given” means the partner has approved their branding.
-
How to Obtain Consent: Use the Co‑Branding Consent form; it collects partner information and a consent agreement. Lendware automatically checks for duplicate contacts by email/phone.
-
Dynamic Updates: The form preview updates in real‑time. Only available data (cell phone, license number, etc.) appears; missing optional data simply doesn’t show.
5. Best Practices & Troubleshooting
-
Do Not Edit the Playbook Email: Opening or editing the email template from the automation page can break the email. Instead, update your user custom field; if further customization is required, contact Lendware support.
-
Field Naming: Be precise when naming your custom field; the merge tag is generated from the field name. If you later change the name, the merge tag stays the same, but clarity matters for your team.
-
CSV Imports: If you plan to sync transaction or contact data into custom fields (e.g., to personalize automations), follow the multi‑step process described in Lendware’s guide: create custom fields, prep your CSV, map fields during upload, and then use the data in emails and automations.
-
Beta Features: Forms, dynamic co‑branding, marketing sites and enterprise branding are currently Beta features and may not be available to all users. Reach out to your Lendware Account Manager or support if you need access or run into issues.